Superintendent & Superintendent Support
As a Superintendent / Superintendent Support, you'll be assigned to some Districts. You'll have permission and access to all the screens of Principals & Teachers within your Districts.
ACTIVITY TAB
Overview

1. After logging in, you'll land on the Activity Screen. Here you can see several pieces of information:
a) The Filter Droplist
b) The Main Information:
- The Legends at the top: explains what the colors mean.
- The last date a Student took a test in certain Class
- Formative Test Data
- Summative Test Data
c) The Status Boxes
d) "Export to Excel" Button: If the data is too big, that it spans across multiple pages, then you can use this to export everything into an Excel file and view them all.
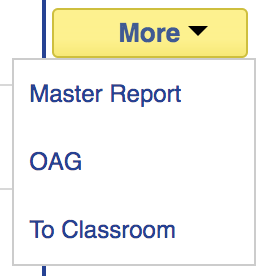
e) "More" Button: This is the quick links to the Master Report, the Objective Accountability Graph (OAG), and Classroom screen of each Class.
NOTE: There is the "CLICK HERE" link to access these and other professional development tools or to download PDFs of assessments

Using the Filter Droplists

1. If you need to filter the Activity of a specific School / Teacher or Grade, use the Dropdown Menus at the top of the page.
2. After you've specified the Filter Criteria, click "Apply" button.
The Status Boxes Explained
1. If a Test is Enabled for Monitor, then it'll be counted in the Enabled Tests Box, regardless of whether the Students have taken the Tests or not.
2. If a Test is Disabled, we'll check if Students have taken this Test or not. If the Test has Scores, it'll be counted under Completed Tests Box. Otherwise, it'll be counted under Remaining Tests Box.
3. To understand these Boxes, we'll look at an example of "J Math 4" Classroom below:
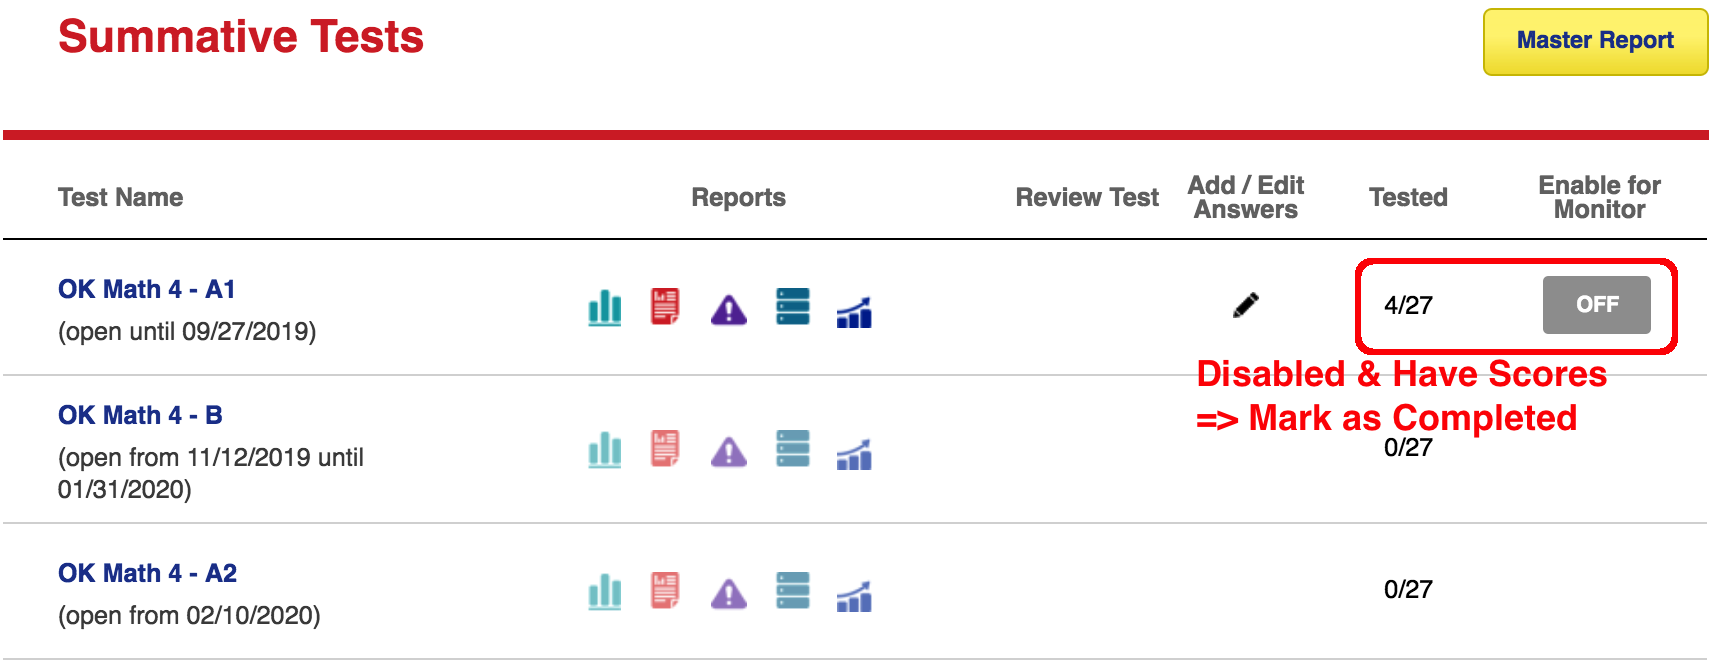
4. Here at "J Math 4" Classroom, at the beginning of School Year, only Summative Test A1 has Scores, and it is also Disabled. So it is counted as 1 Completed Summative. The other 2 Tests will be counted as 2 Remaining Summatives.
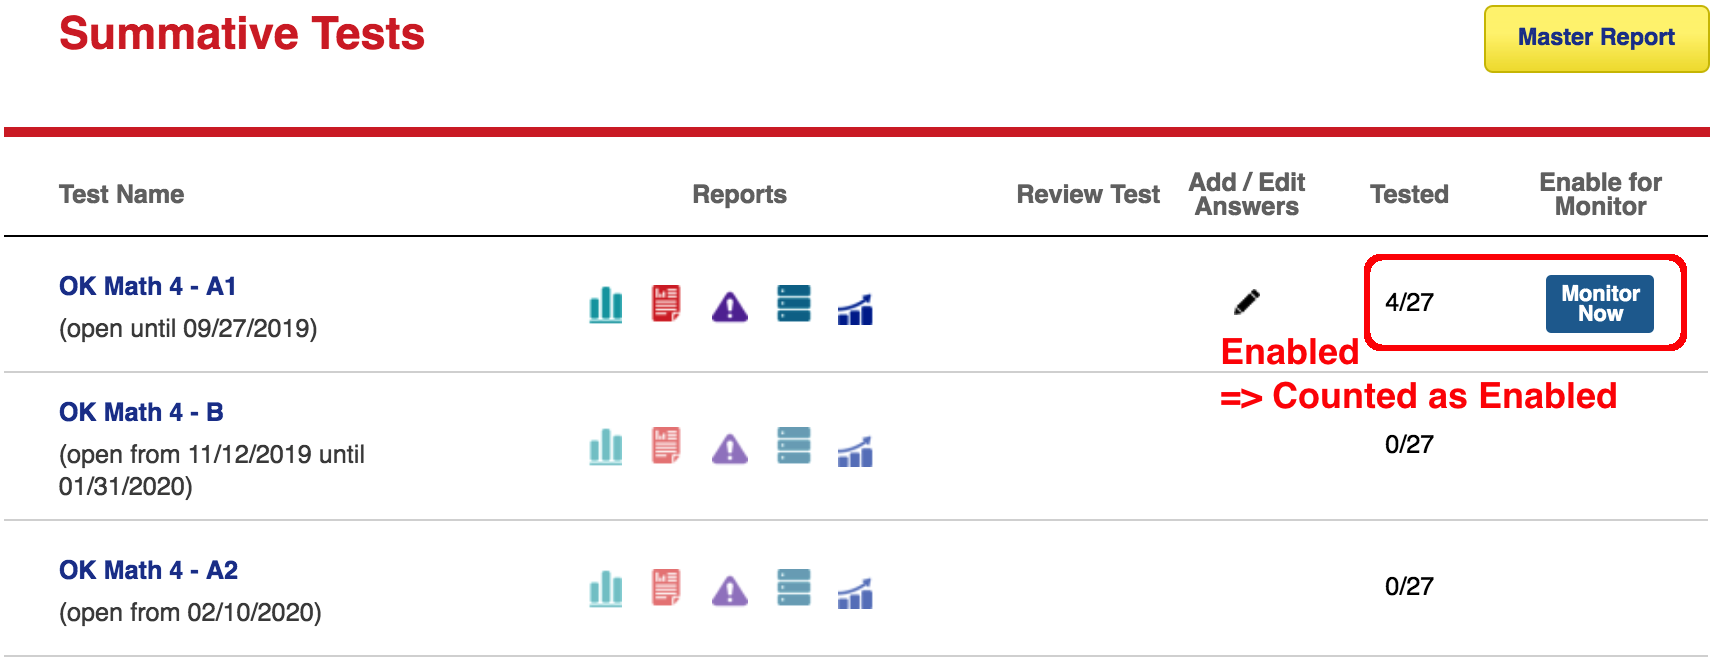
5. (If the Summative Test A1 is otherwise Enabled, we'll consider it an On-going Test. And even though it has Scores, it'll be counted as 1 Enabled Summative)
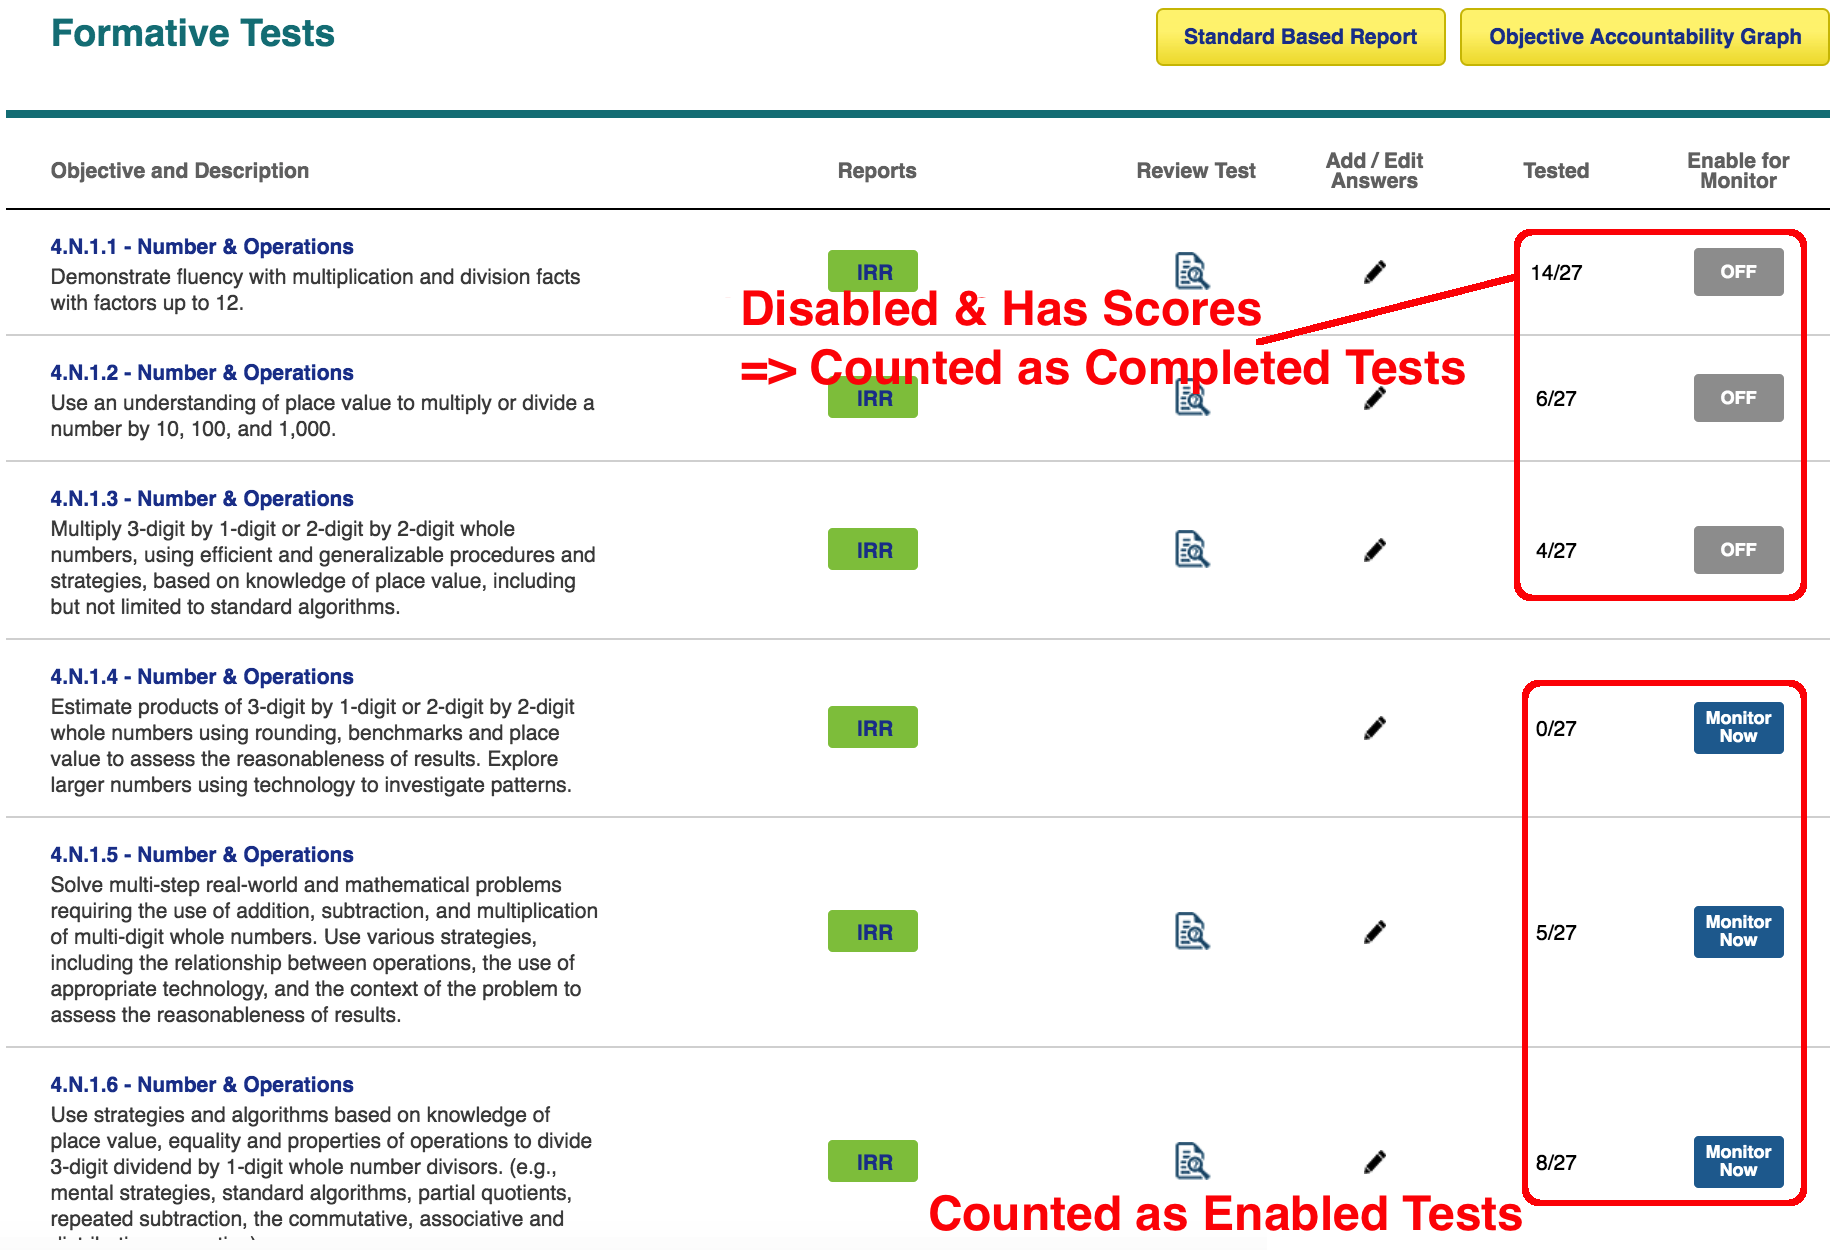
6. There are totally 34 Formative Tests. Here, we have 3 Enabled Formatives and 3 Completed Formatives. Hence, there are 28 Remaining Formatives.
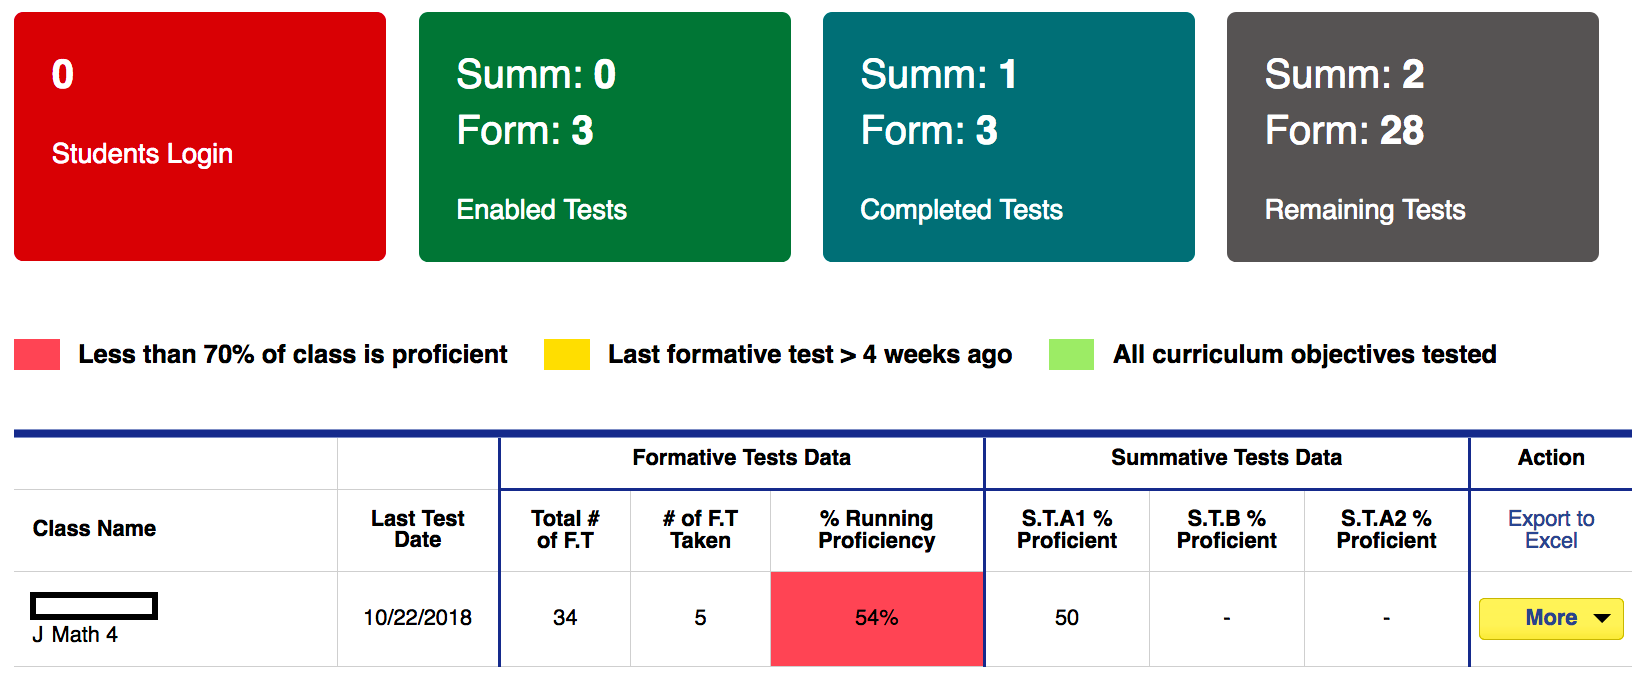
7. Adding all the numbers in 4 & 6, we have: 3 Enabled Formatives; 1 Completed Summative, 3 Completed Formatives; 2 Remaining Summatives, 28 Remaining Formatives.
8. The First Box will display Number of Students currently logged in.
9. As the School Year progresses, the number of Completed Tests should increase, and the number of Remaining Tests should decrease.
CLASSROOM TAB
Overview
1. To access the Test Information and Reports for your Classrooms, click the Classroom Tab from the menu.
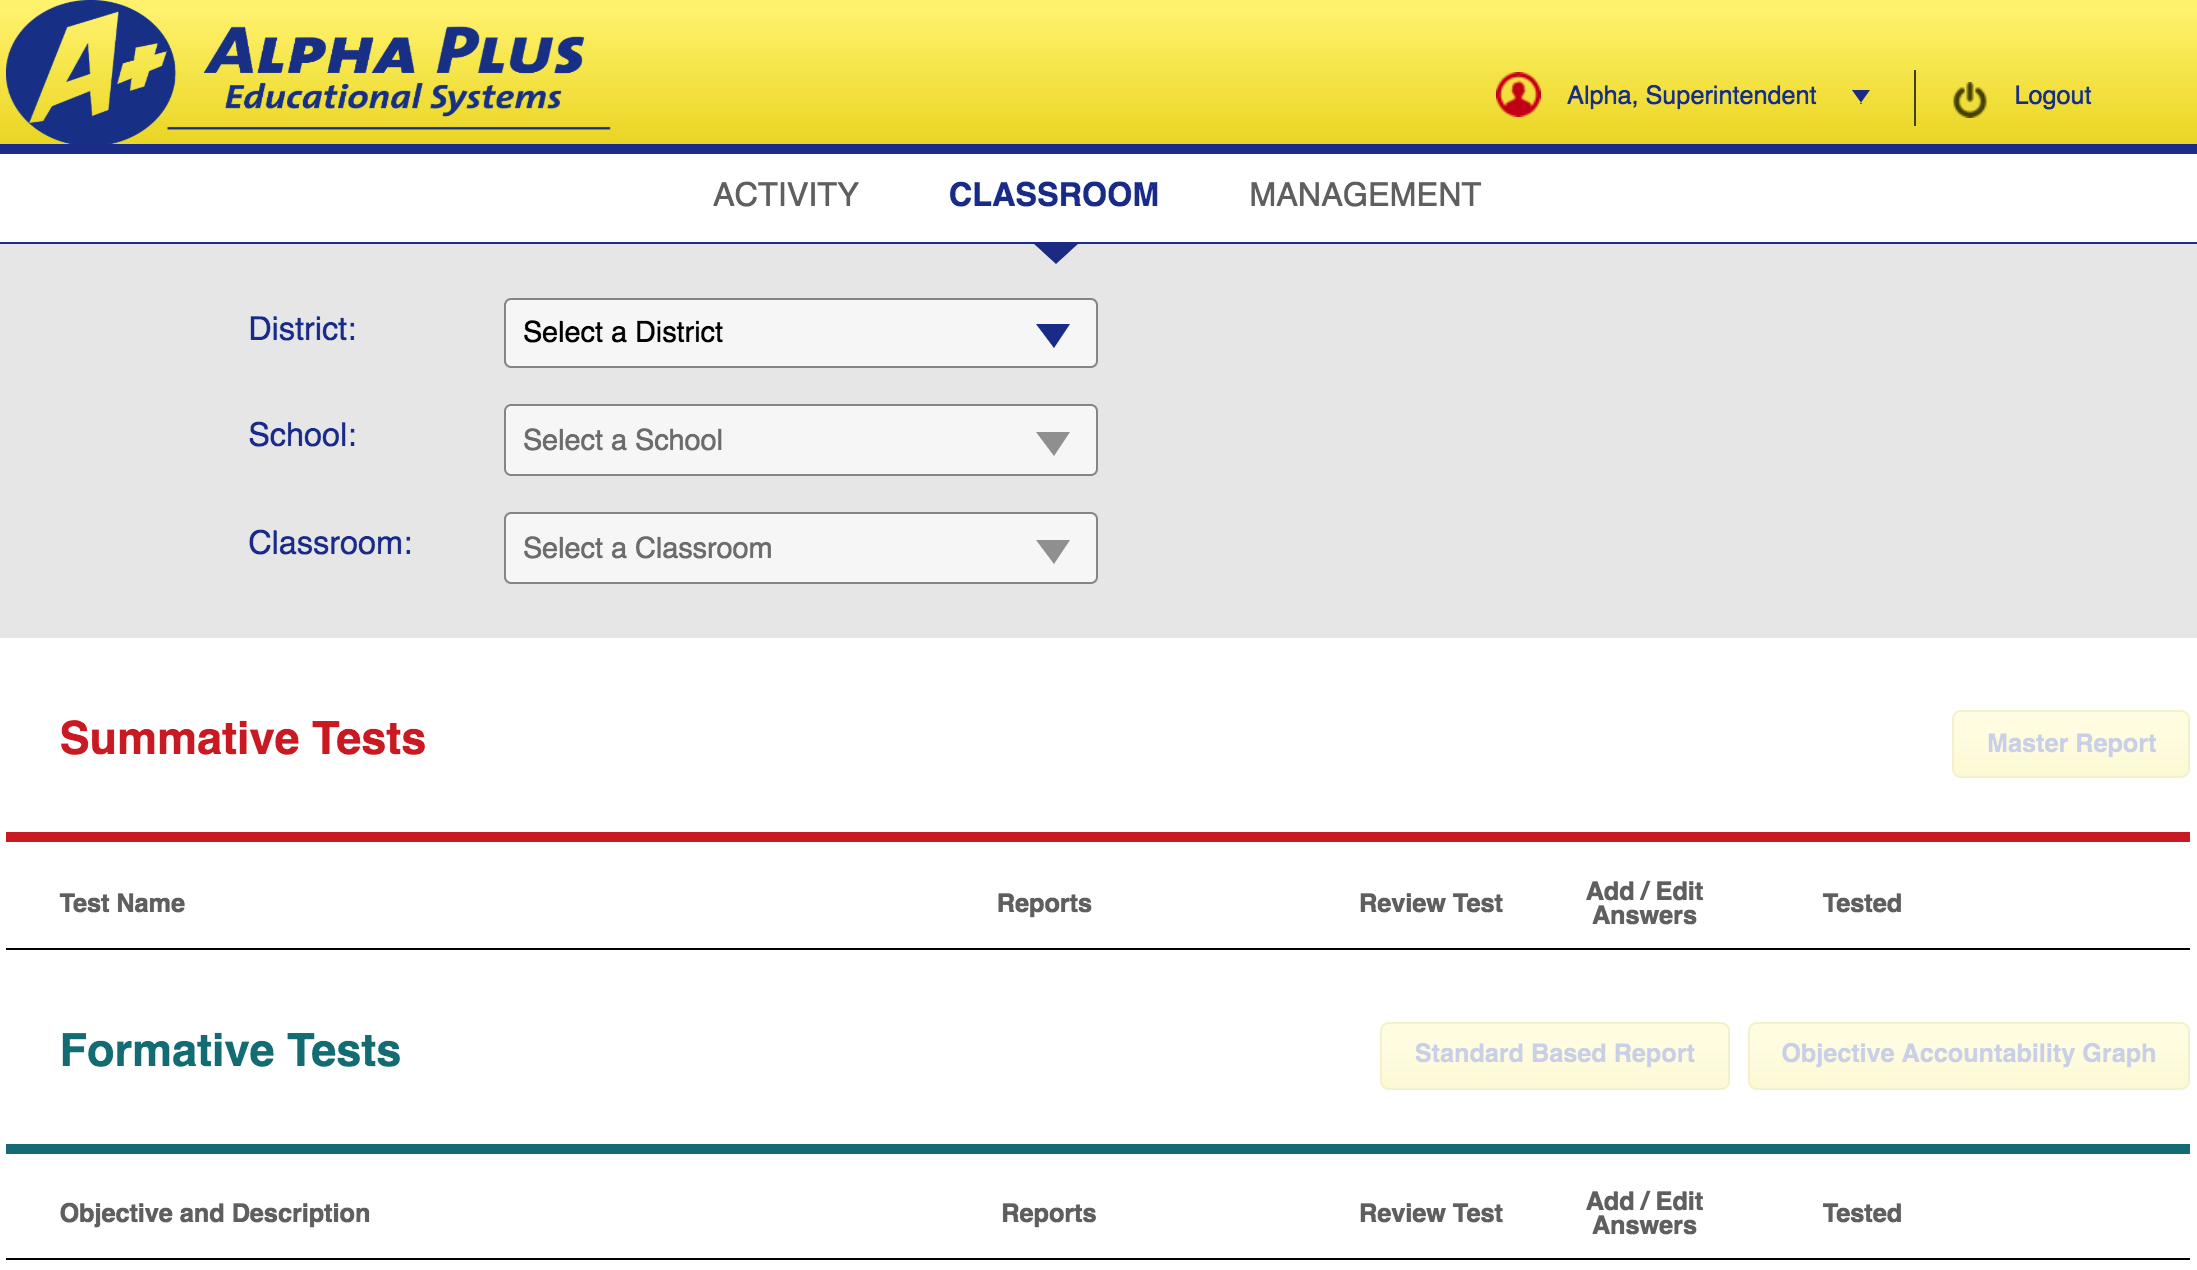
2. Using the Dropdown Menus, select a Classroom you want to inspect. The Information will then be loaded accordingly.
3. AT THE TOP, you'll see "Summative Tests" Section.
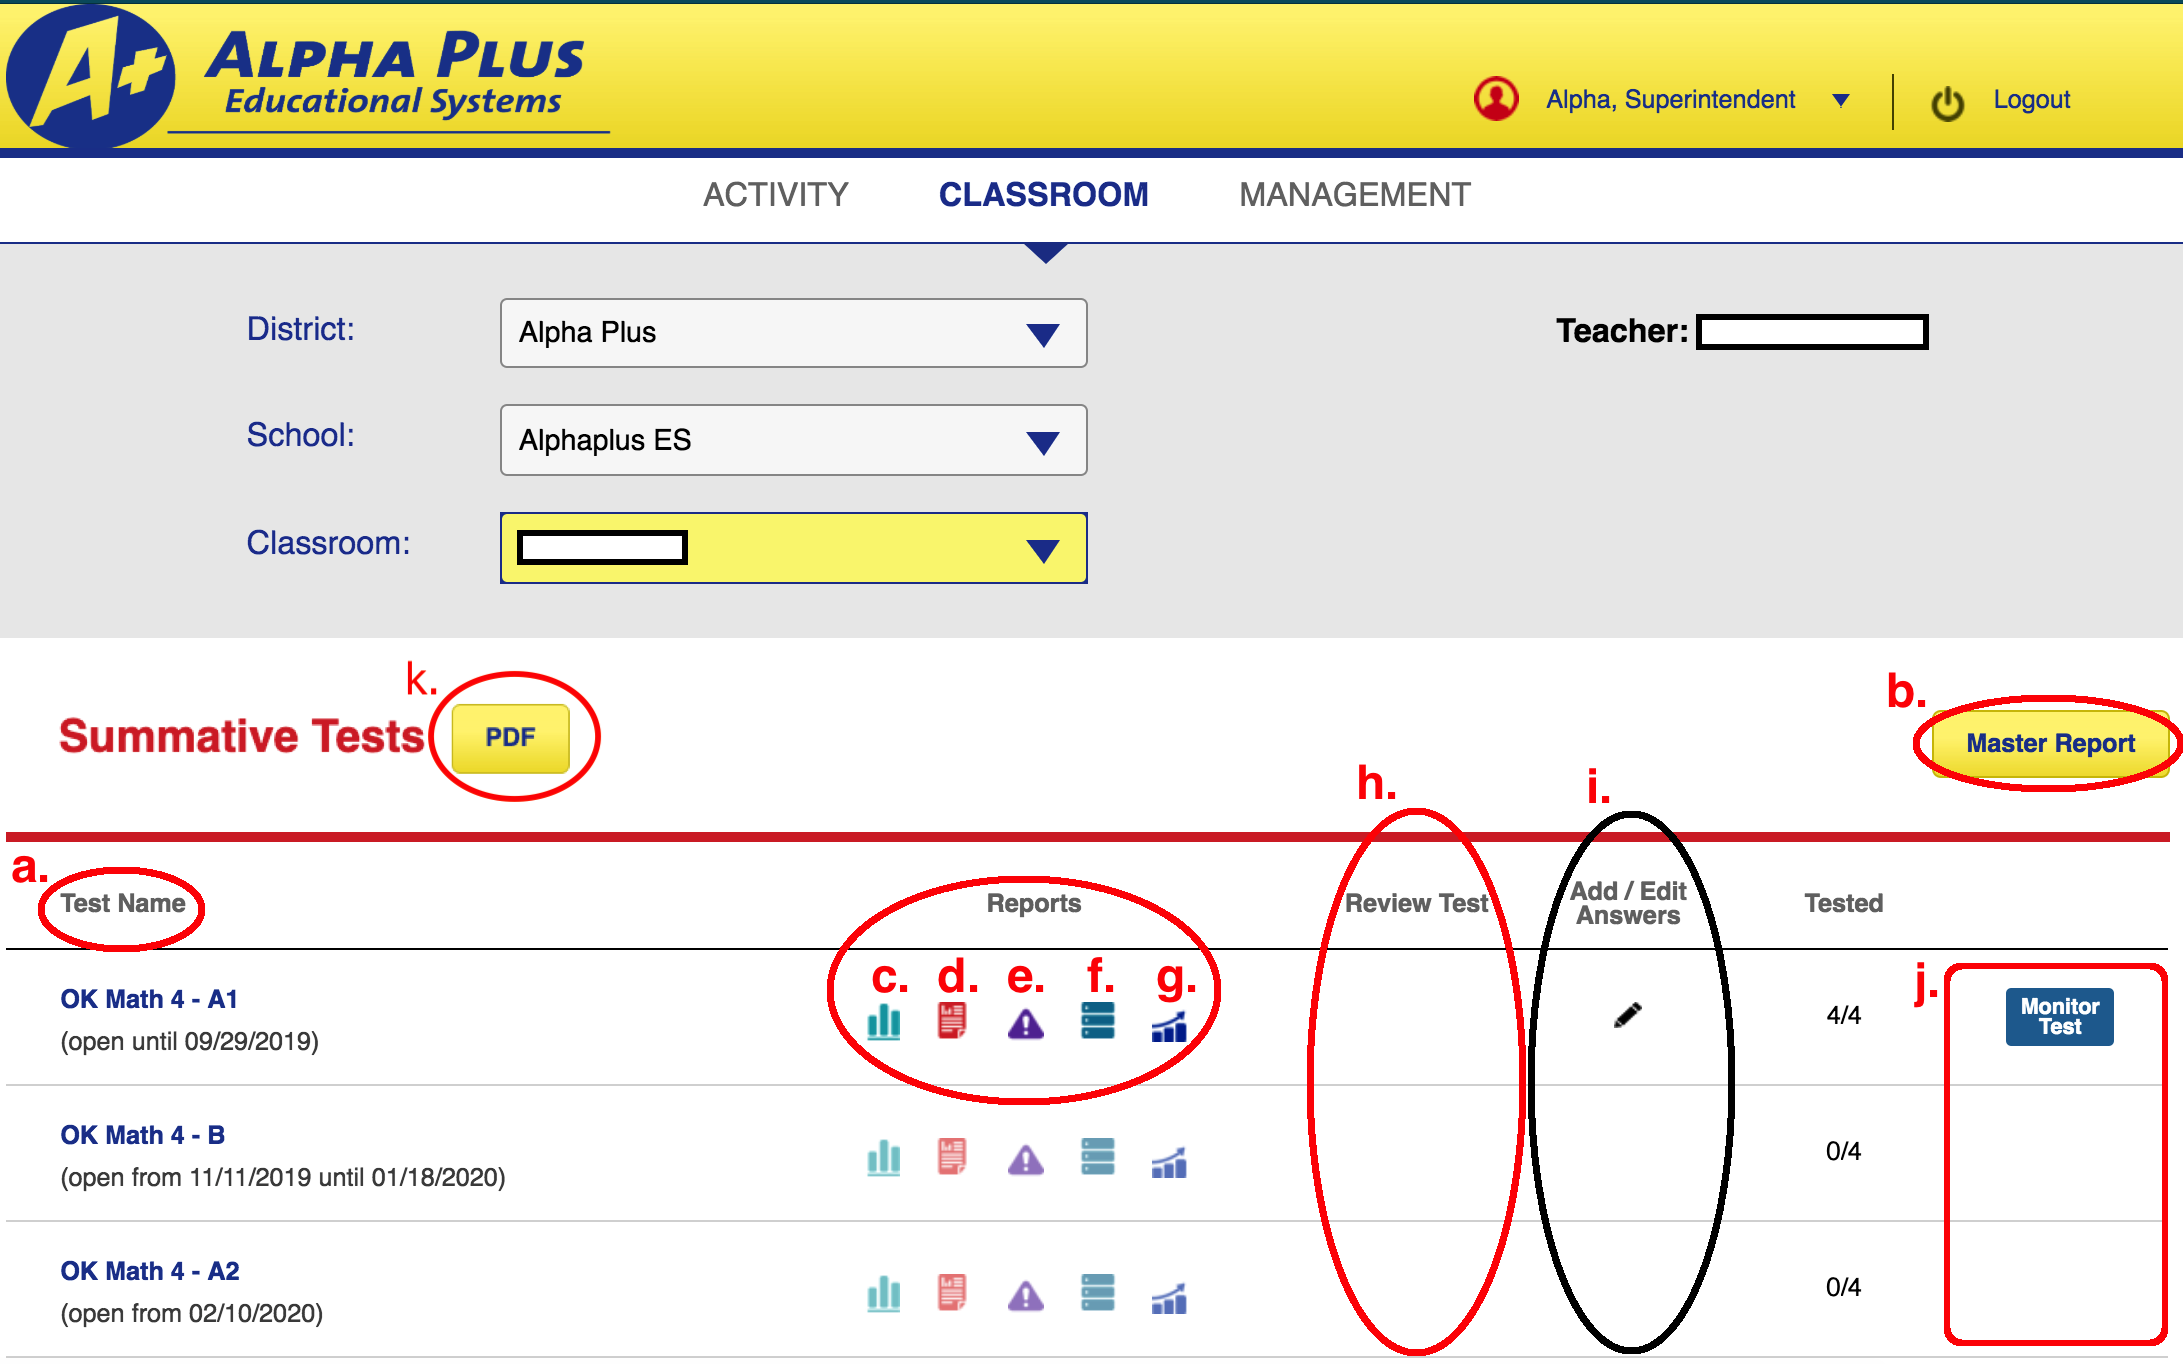
Here you'll have access to various options:
a) Test Name: Summative Test Names, and their corresponding Testing Window. eg, you can only enable Summative Test B from Nov 11 2019 till Jan 18 2020.
b) Master Report
c) Grade Frequency & Distribution
d) Item Response Report (for Summative)
e) Standard at Risk
f) Classroom List
g) Student Test Report
h) Review Test: after at least 1 of your Students has done the Test, a  button will be shown. You can click on this button to do Test Remediation with your Students. For more info, please go here
i) Add / Edit Answers: When your Students did the Tests on paper-pencil and you want to submit their answers to our system, OR when you want to edit their previous answers (not recommended), please click this  button. For more info, please go here
j) Monitor Test: Click this button to access the Monitor Tests Screen
k) "PDF ►" Button: To access Alpha Plus Pacing Calendars and PDF copies of quizzes.
NOTE: At one time, you can access only 1 Summative Test.
4. AT THE BOTTOM, you'll see "Formative Tests" Section

Here you'll have access to various options:
a) Standard Based Report
b) Objective Accountability Graph
c) Objective and Description: These Codes and Descriptions will match with the Oklahoma Academic Standards.
d) Item Response Report (for Formative)
e) Review Test: after at least 1 of your Students has done the Test, a button will be shown. You can click on this button to do Test Remediation with your Students. For more info, please go here
f) Add / Edit Answers: When your Students did the Tests on paper-pencil and you want to submit their answers to our system, OR when you want to edit their previous answers (not recommended), please click this button. For more info, please go here
g) Monitor Test: Click this button to access the Monitor Tests Screen
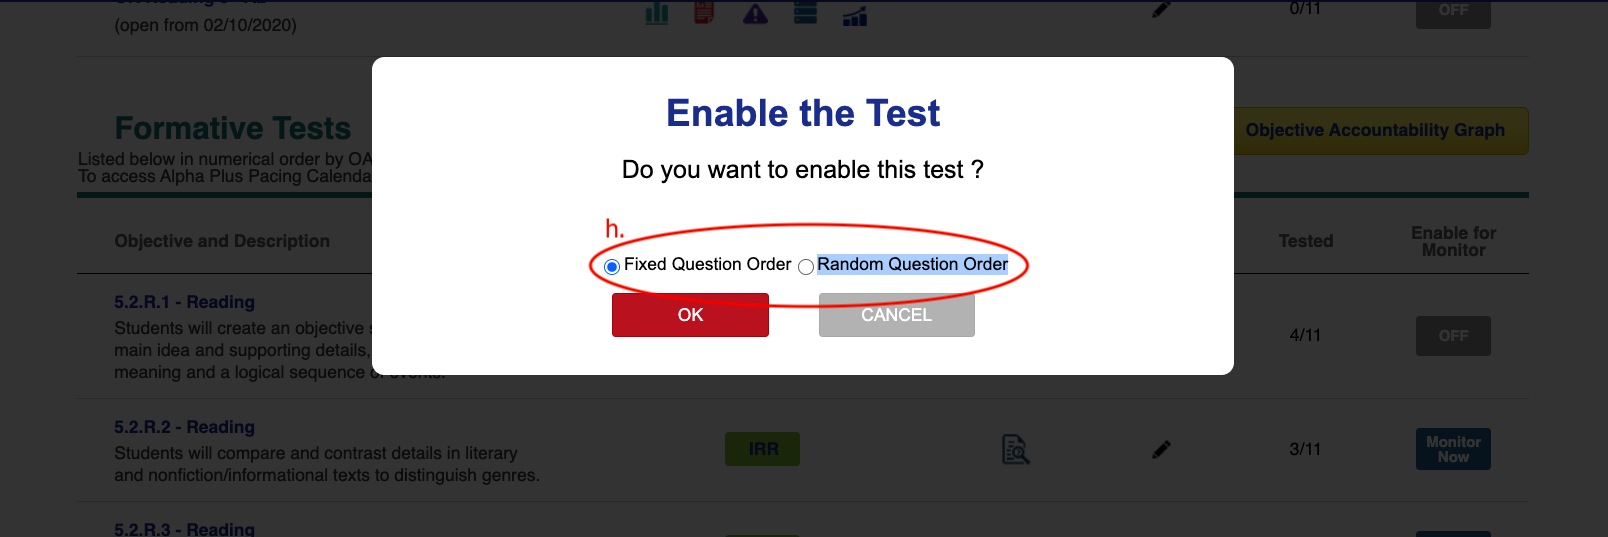
h) On/Off Randomize The Question Order: Able to decide the question order by switch between two options:
h.1) "Fixed Question Order": The questions order is similar for all students in the classroom.
h.2) "Random Question Order": The questions order is difference for all students in the classroom.
i) "Click Here ►" Link: To access Alpha Plus Pacing Calendars and PDF copies of quizzes.
Monitor Tests Screen
1. After clicking the "Monitor Tests" Button, you'll be redirected to Monitor Tests Screen, where you can observe / manage the progress of Students taking Test.
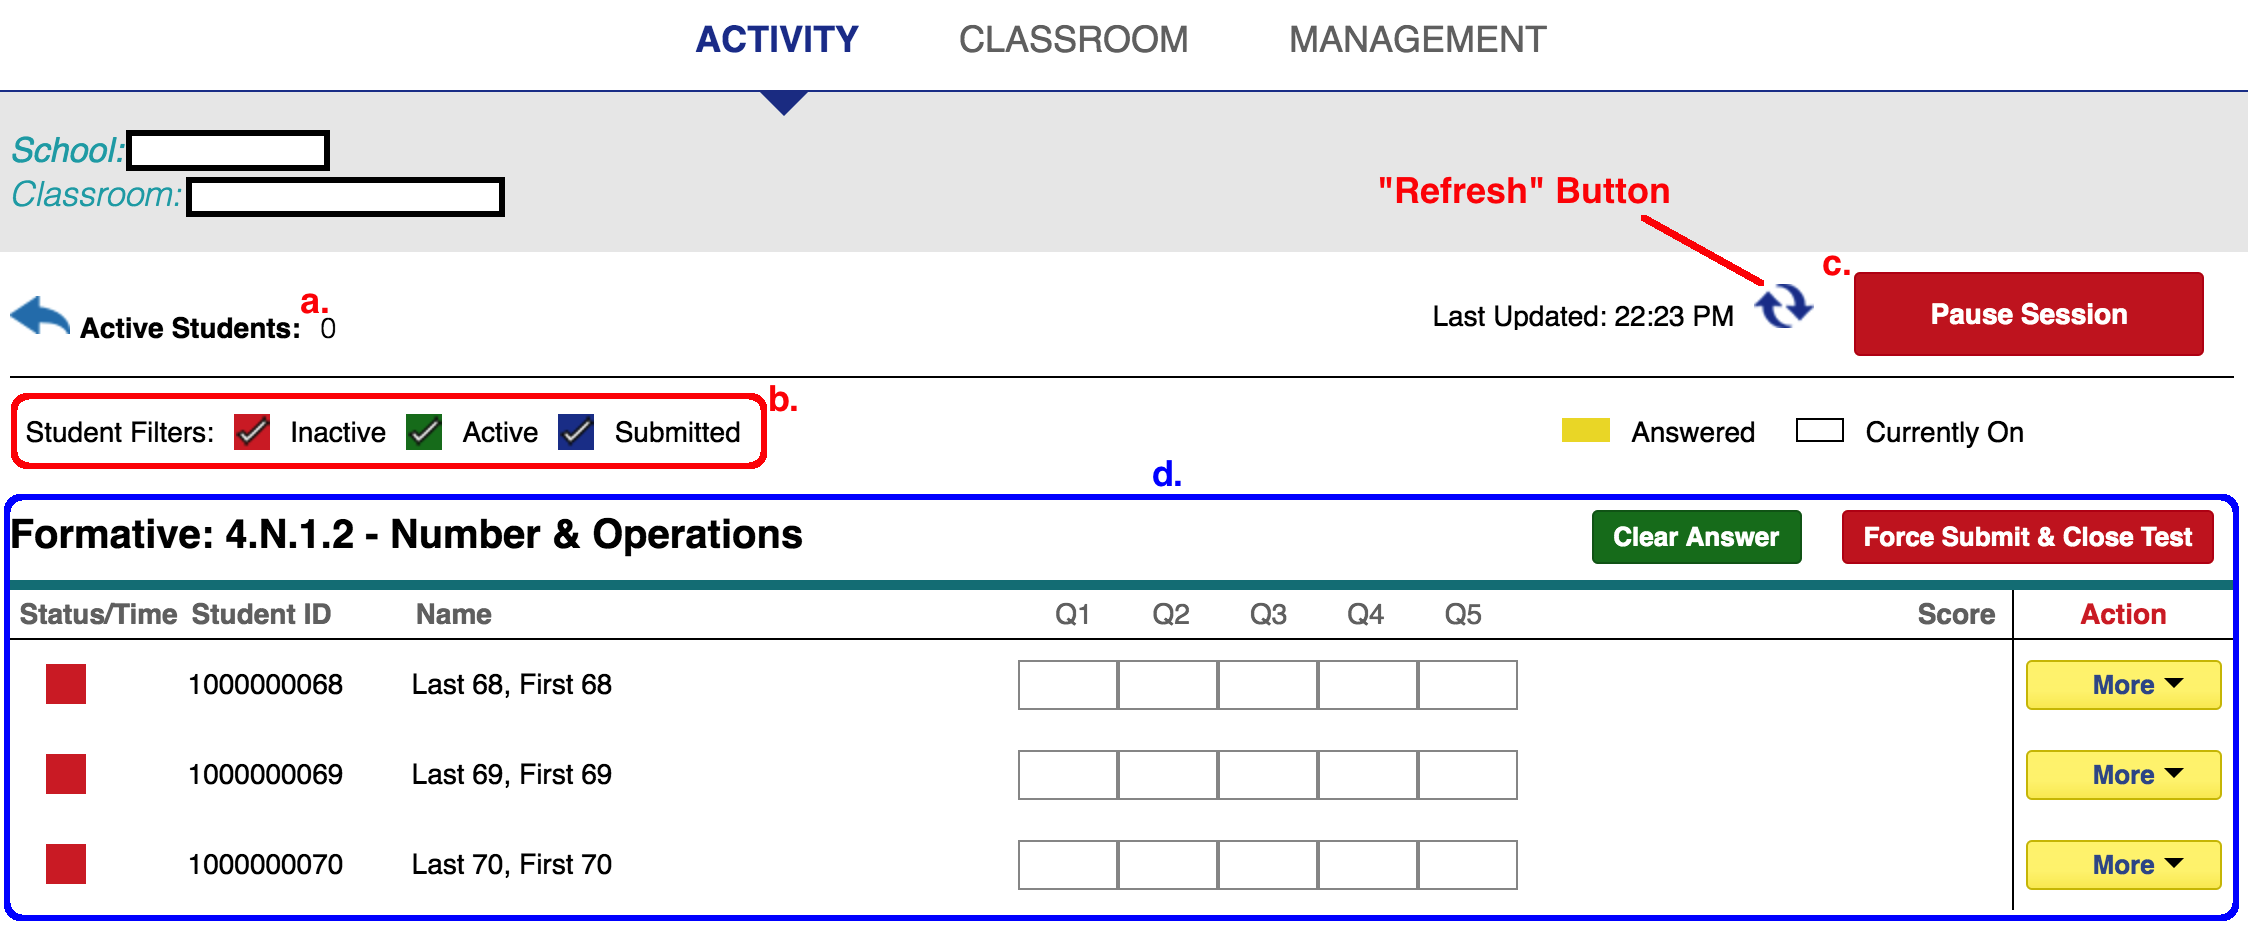
Here you can see several pieces of information:
a) "Active Students": The number of Active Students currently doing the Tests.
b) "Student Filters" Checkbox: for when you want to view only Inactive Students, or only Submitted Students, etc.
c) "Pause Session" Button: for when you want all Students to pause their progress.
d) Main screen of the Summative / Formative Test (Refer to Classroom screen > Enable for Monitor column).
2. Here, you'll have various actions available:
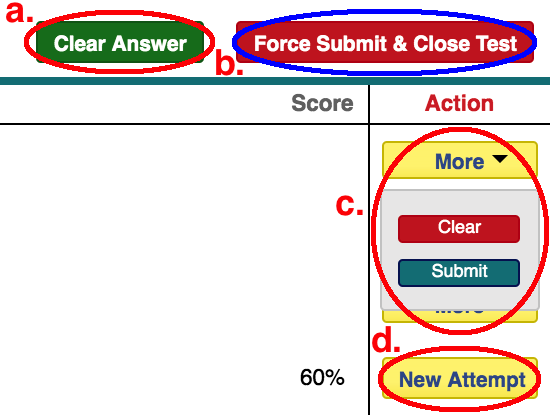
a) "Clear Answers" Button: when you want to clear all Pending Answers of Students, who haven't submitted their answers in this Test.
b) "Force Submit & Close Test" Button: when you want to force all Students, who haven't submitted their answers in this Test, to stop and submit their answers immediately, eg: when the time is up.
c) "More": this Action will be displayed for Students not yet submitting their answers. This is for when you want to Clear Answers or Force Submit this individual Student only.
d) "New Attempt" Button: this Action will be displayed for Students already submitting their answers. When you click this button, the Student will be given another Attempt for him/her to try the test again.
NOTE: The old answers will still be stored in the system. You can edit or remove it in Add / Edit Answers Screen
3. IMPORTANT: Students should never retest on a Formative Test until remediation has been provided on the specific objective.
Add / Edit Answers Screen
1. After clicking the button, the Add / Edit Answers Screen will appear.
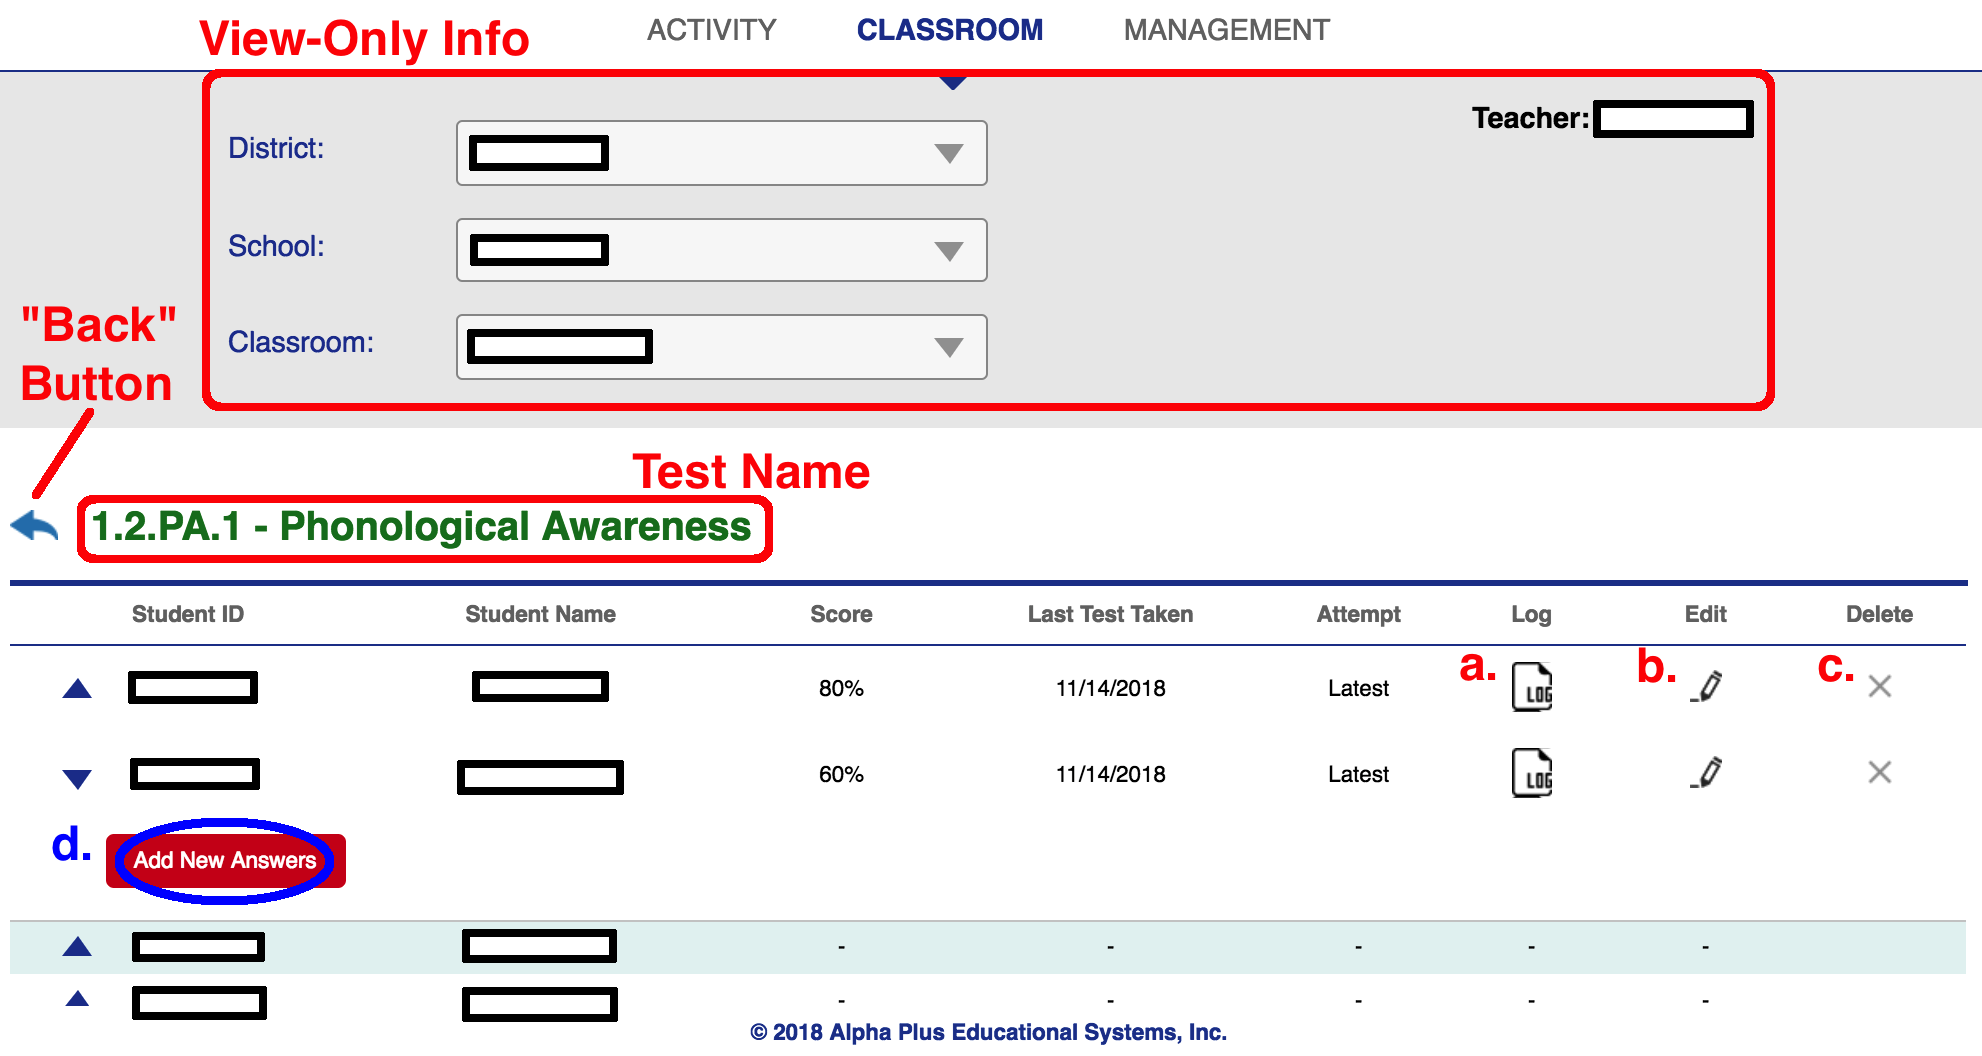
Here you have several options.
a) "Log" Button: View History Log of this Score. For example, if a Student is transferred from another School, you may want to check who marked his Scores.
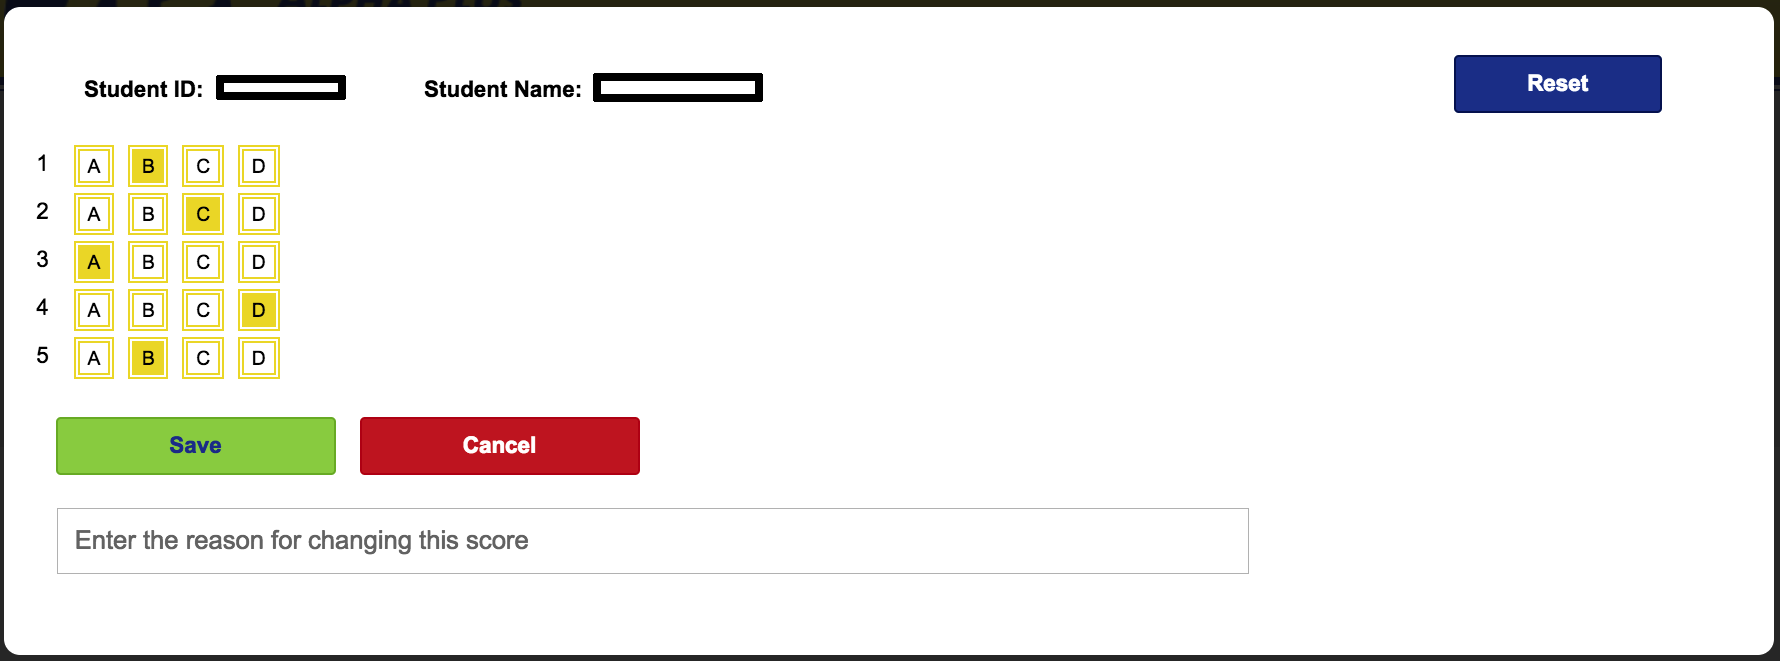
b) "Edit" Button: Edit Answers inside this Attempt. Click on this will popup the Edit Screen as follows:
c) "Delete" Button: Delete an Attempt, if you think this is enterred accidentally. Please be cautious, because this action cannot be reversed.
d) "Add New Answers" Button: For example, after Test Remediation, you let the Students retry the Test on Paper & Pencil. You can enter the new Answers by clicking on this button.
Review Test Screen
1. After clicking the button, the Review Test Screen will appear.
2. There are 2 Types of Questions: those with Normal View, and those with Splitted View:
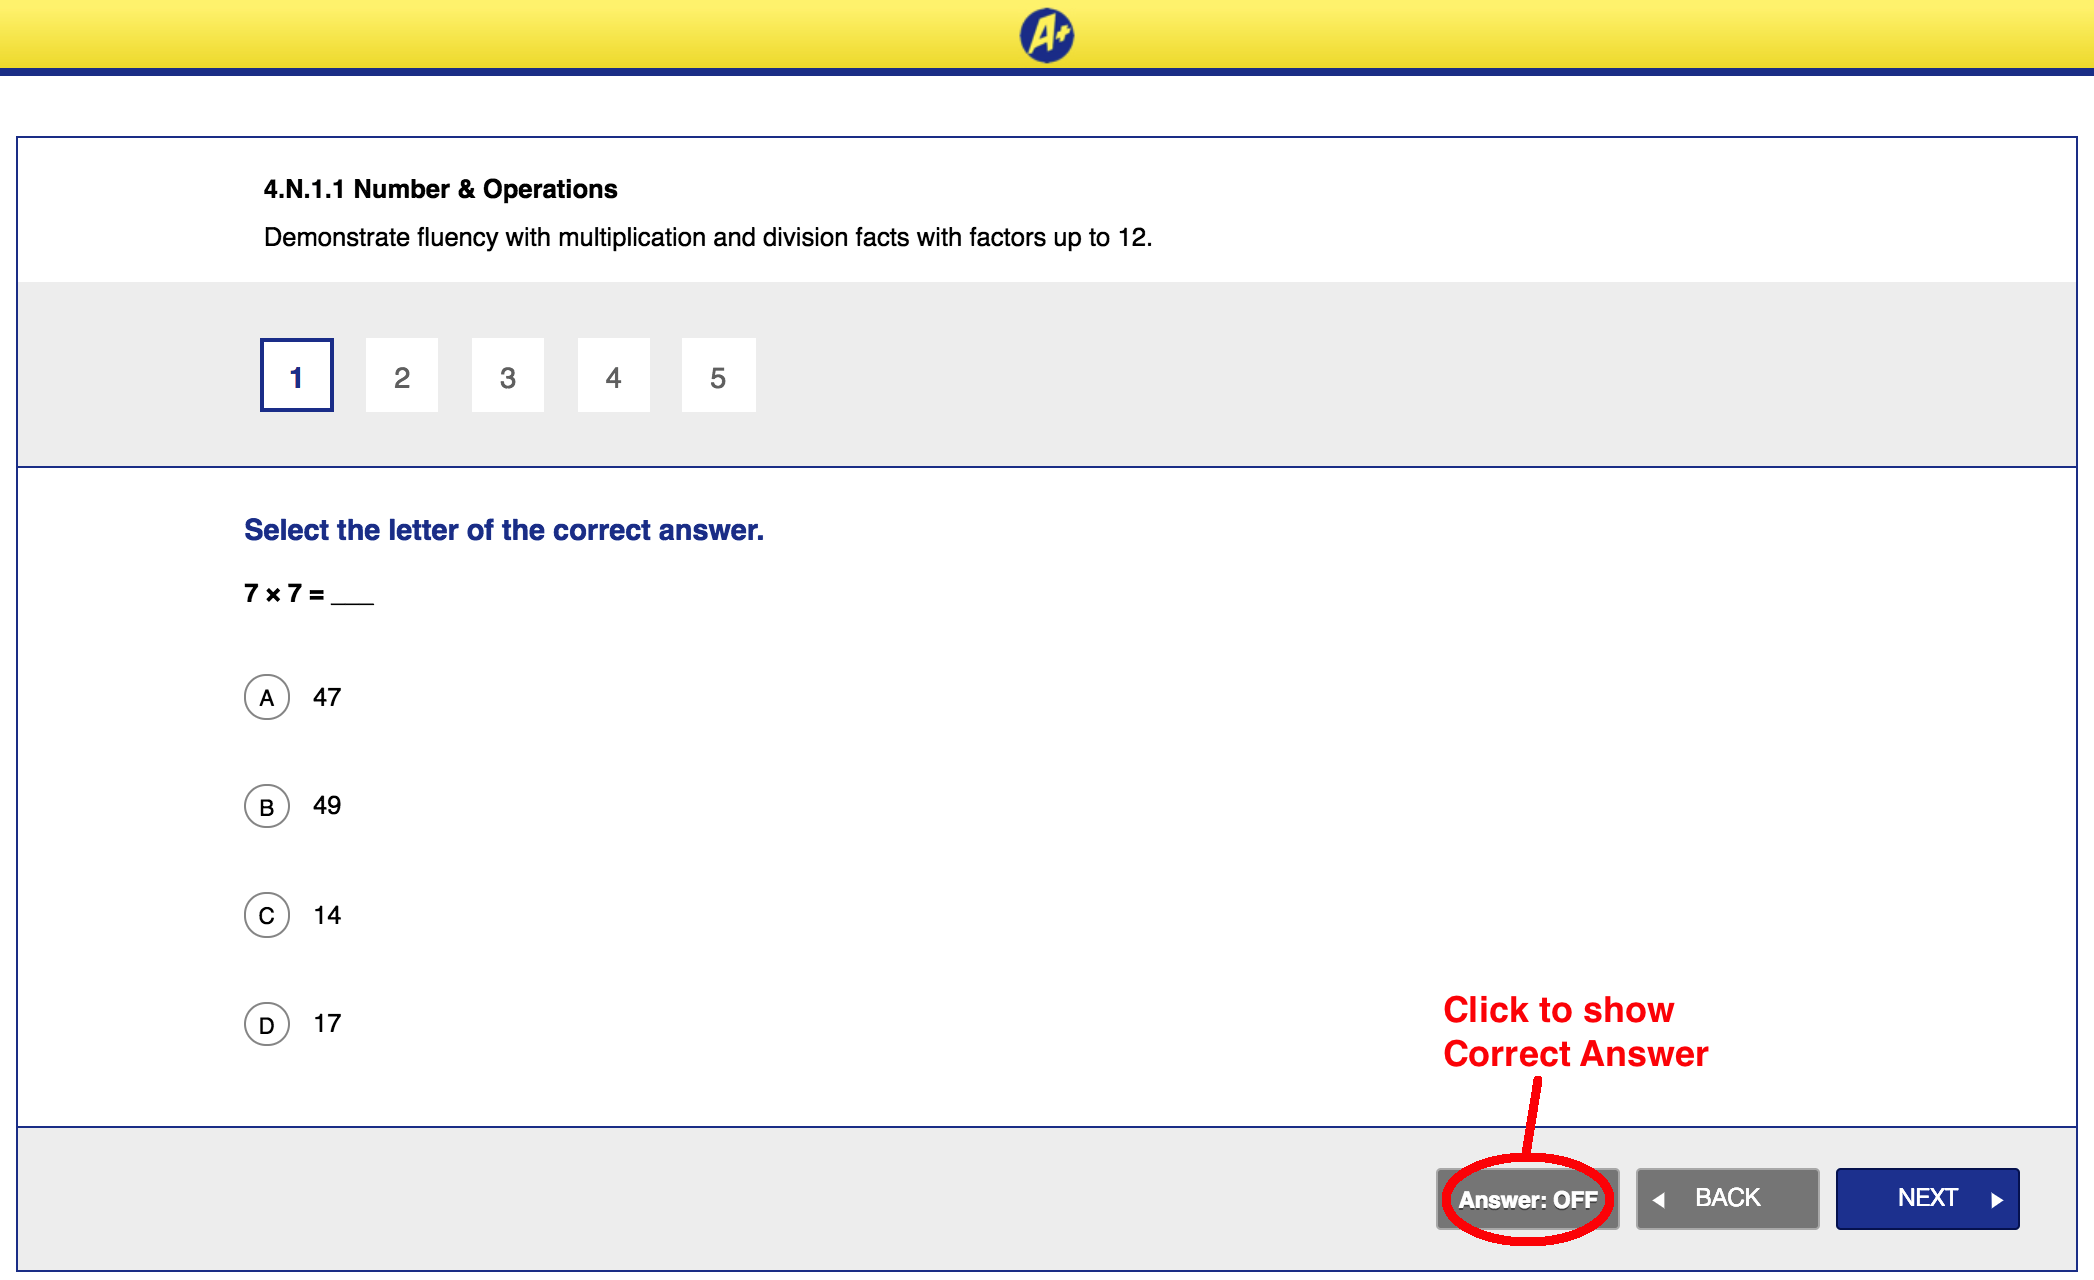
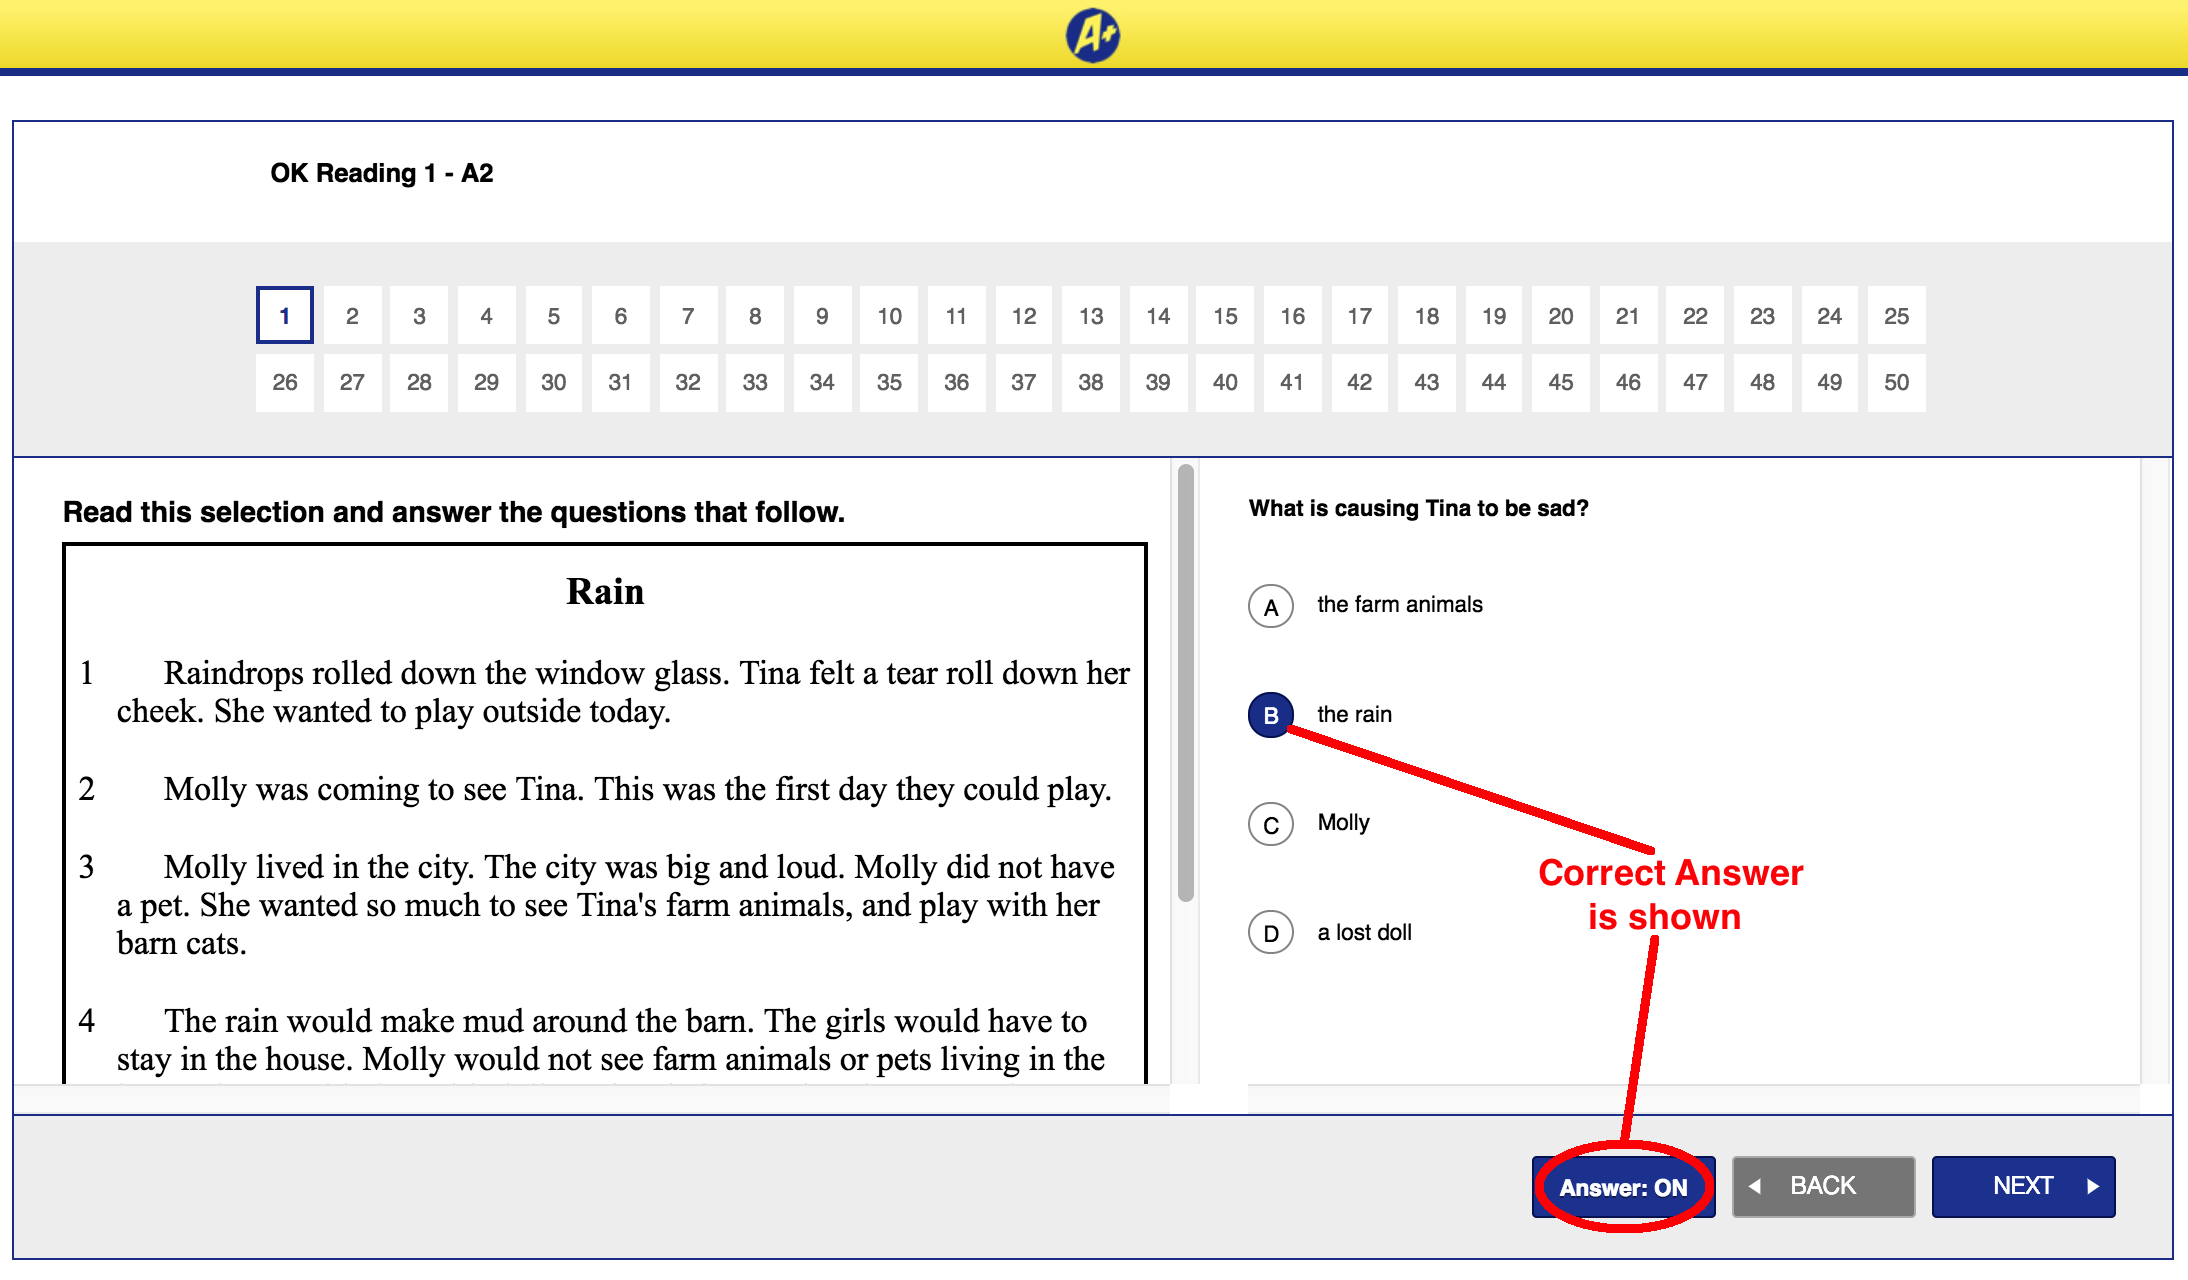
3. By default, the Correct Answer is hidden. After explaining the question of Students, you can proceed to show them the Correct Answer.
MANAGEMENT TAB
ACCESS DISTRICT INFO
1. When you click on Management Tab, a List of Districts assigned to you will be displayed.
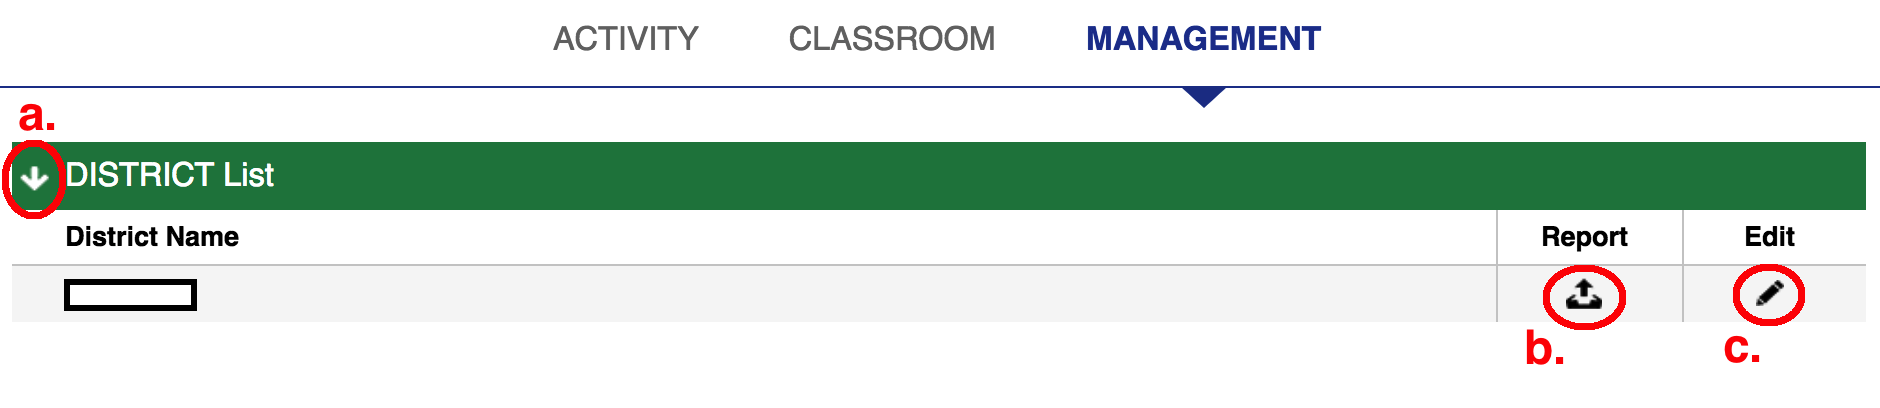
a) "Expand/Collapse" Arrow: When you see this Arrow, it means the List can be Expanded / Collapsed.
b) "Summative Objective Analysis" Button: For more info, please go here
c) "Edit" Button: Click on this to view more details inside.
2. Below is the District Details screen:
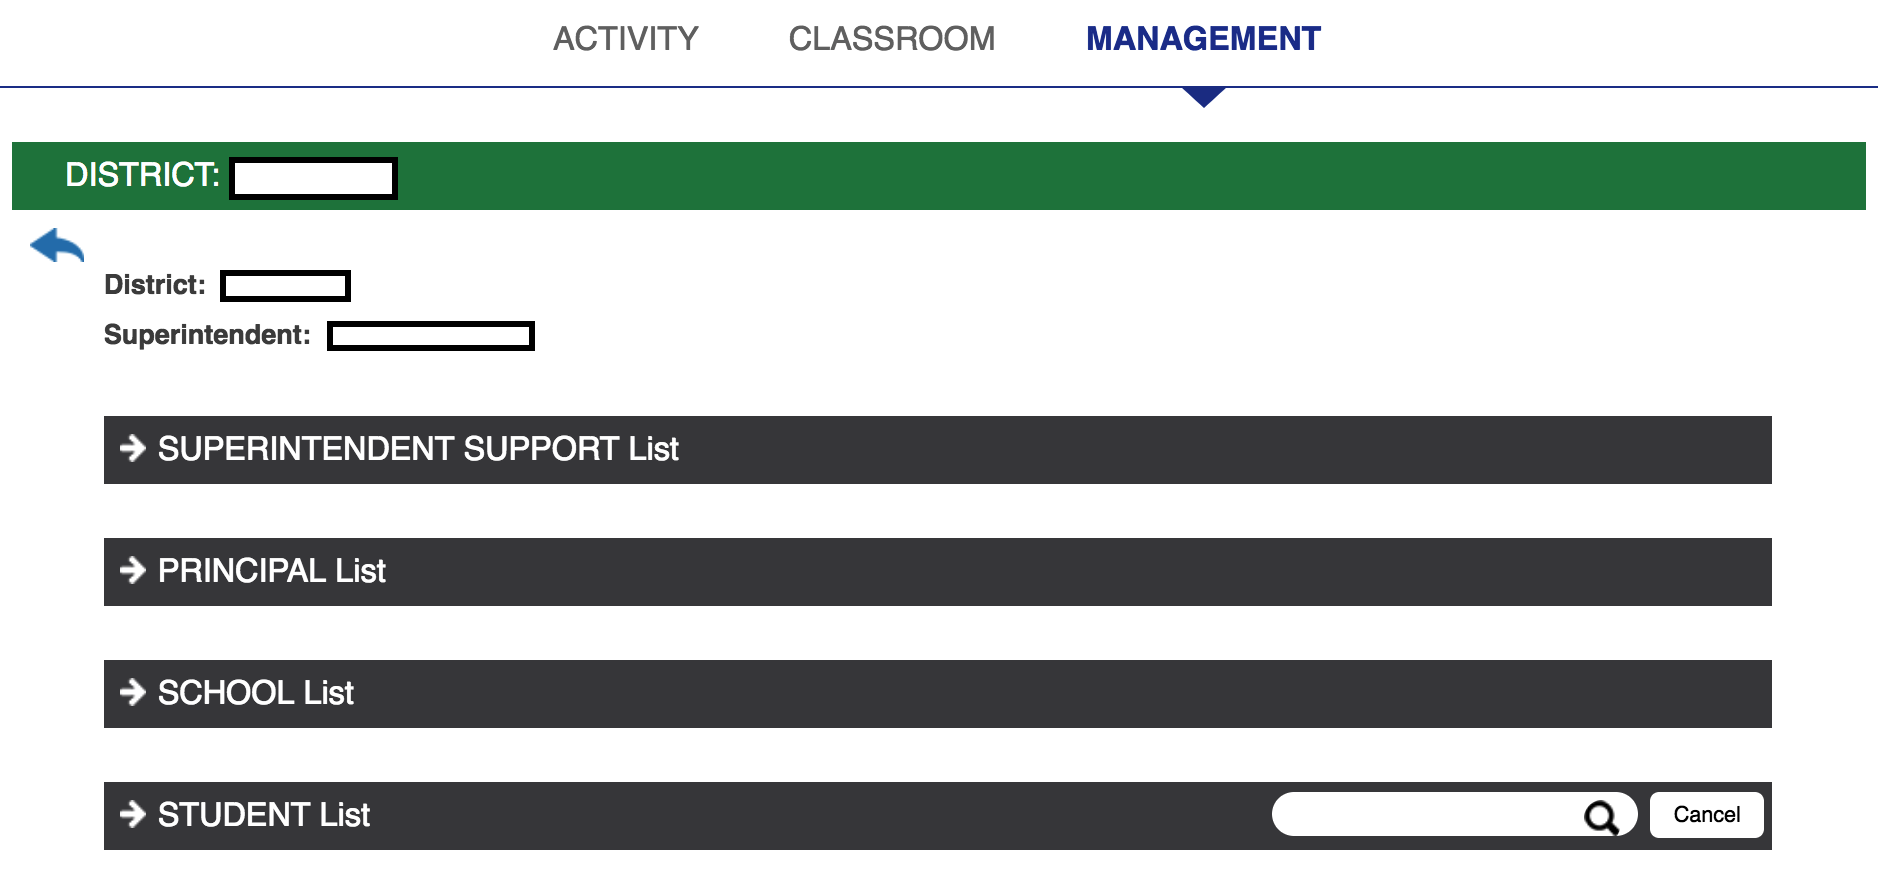
3. Below is the District Details screen with Expanded List:
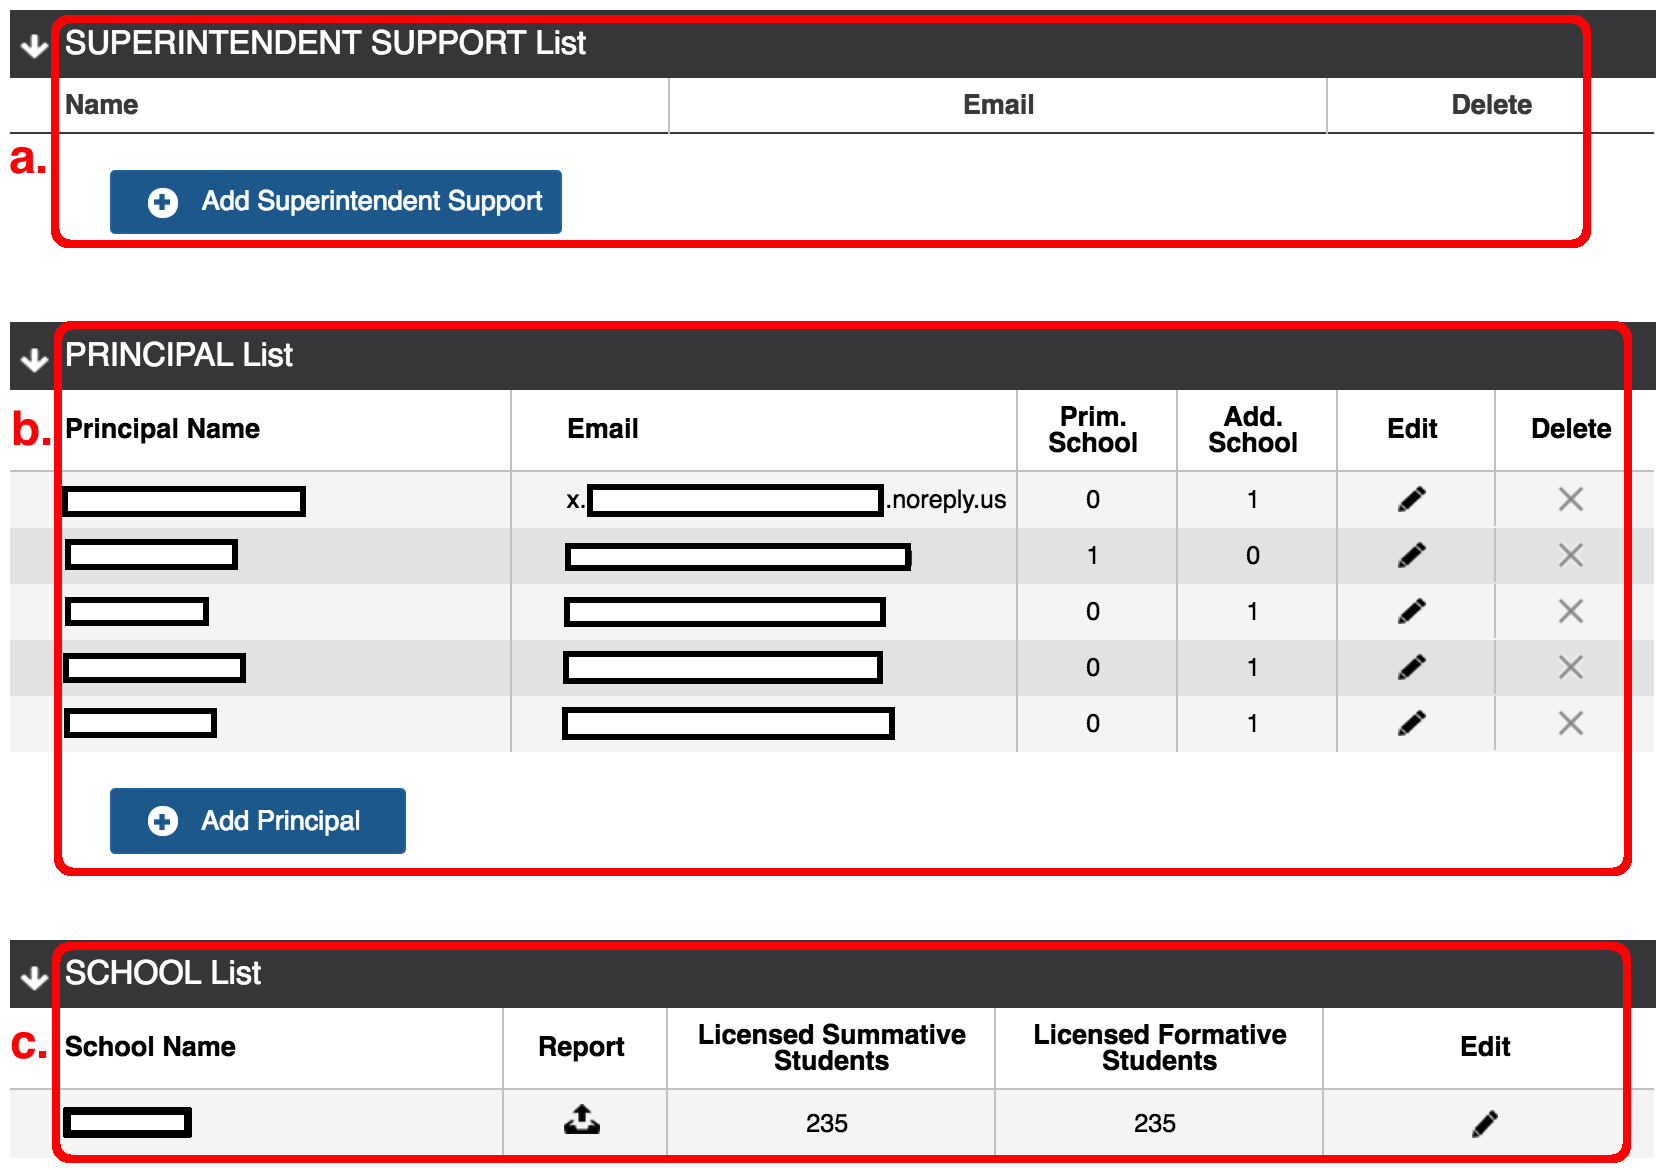
a) Manage Superintendent Supports
b) Manage Principals
c) Access School Information
Manage Superintendent Supports
1. Only Admins can Create, Edit and Delete the List of Superintendents in Alpha Plus System.
2. As a Superintendent, you can only assign or remove another Superintendents into your Districts. This will give them the same Permission and Access as you do.
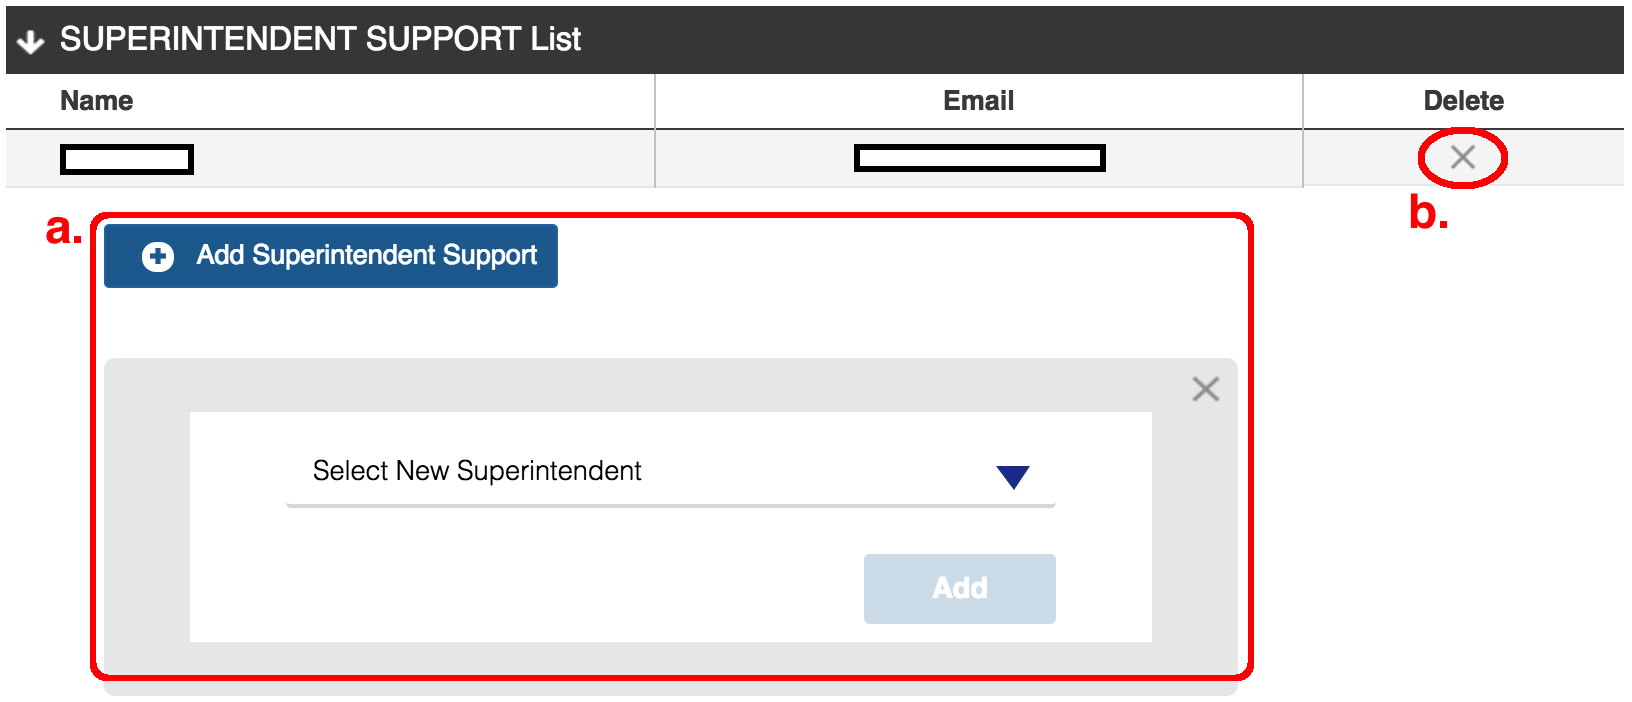
a) Add Superintendent Support: When you click on this button, a Box will appear for you to select and assign.
b) "Delete" Button: Click on this to remove the Superintendent Support from your District.
Manage Principals
1. As a Superintendent, you can Create / Edit / Delete the Principals in your Districts.
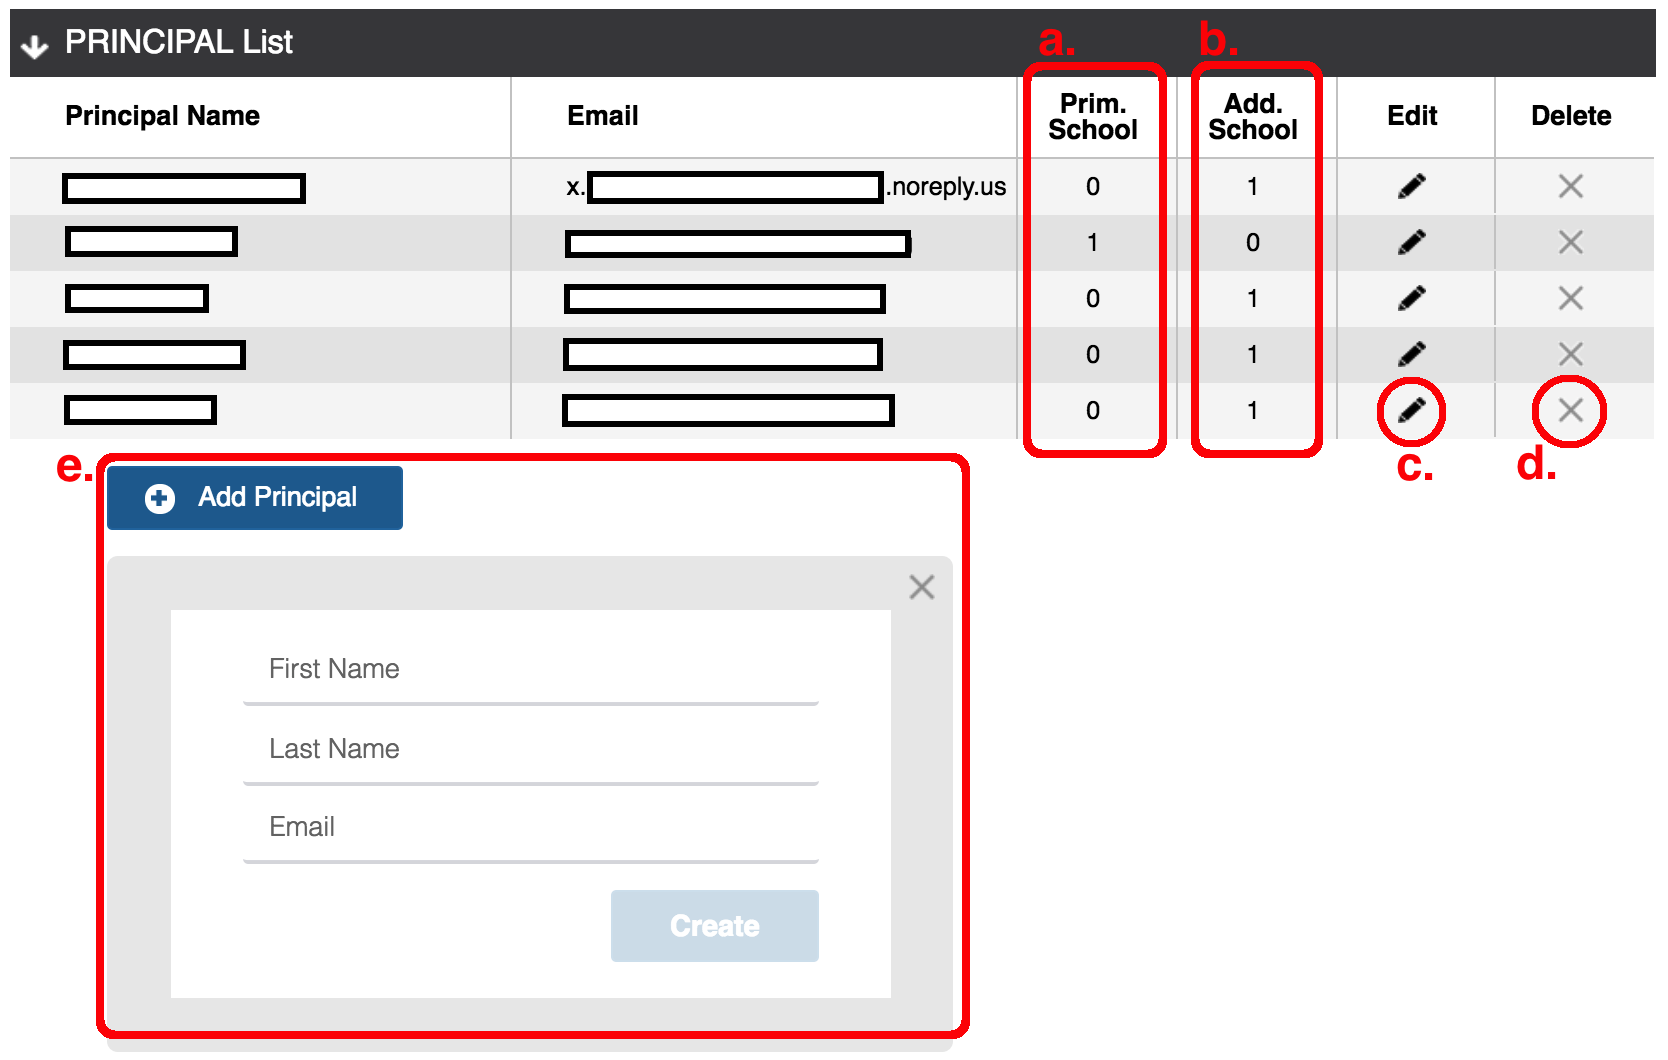
a) Primary School: How many Schools is this Principal assigned to as the Main Principal?
b) Additional School: How many Schools is this Principal assigned to as a Principal Support?
c) "Edit" Button: You can update the First Names, Last Names and Emails of the Principals.
d) "Delete" Button: Before you can Delete a Principal, you must remove him/her from all the Schools that he's assigned to. You can do this by going down to Management > School Details screen.
e) "Add Principal" Button: When you click on this button, a Box will appear for you to create a new Principal.
ACCESS SCHOOL INFO
1. Only Admins can Create and Delete the List of Schools in Alpha Plus System.
2. As a Superintendent, you can Edit the Schools in your Districts only.

a) "Summative Objective Analysis" Button: For more info, please go here
b) Licensed Summative Students: This is the number of Students registered with Alpha Plus System. At the end of School Year, we'll use this number to send you the Audit Report.
c) Licensed Formative Students: This is the number of Students registered with Alpha Plus System. At the end of School Year, we'll use this number to send you the Audit Report.
d) "Edit" Button: Click on this to view more details inside.
3. Below is the School Details screen:
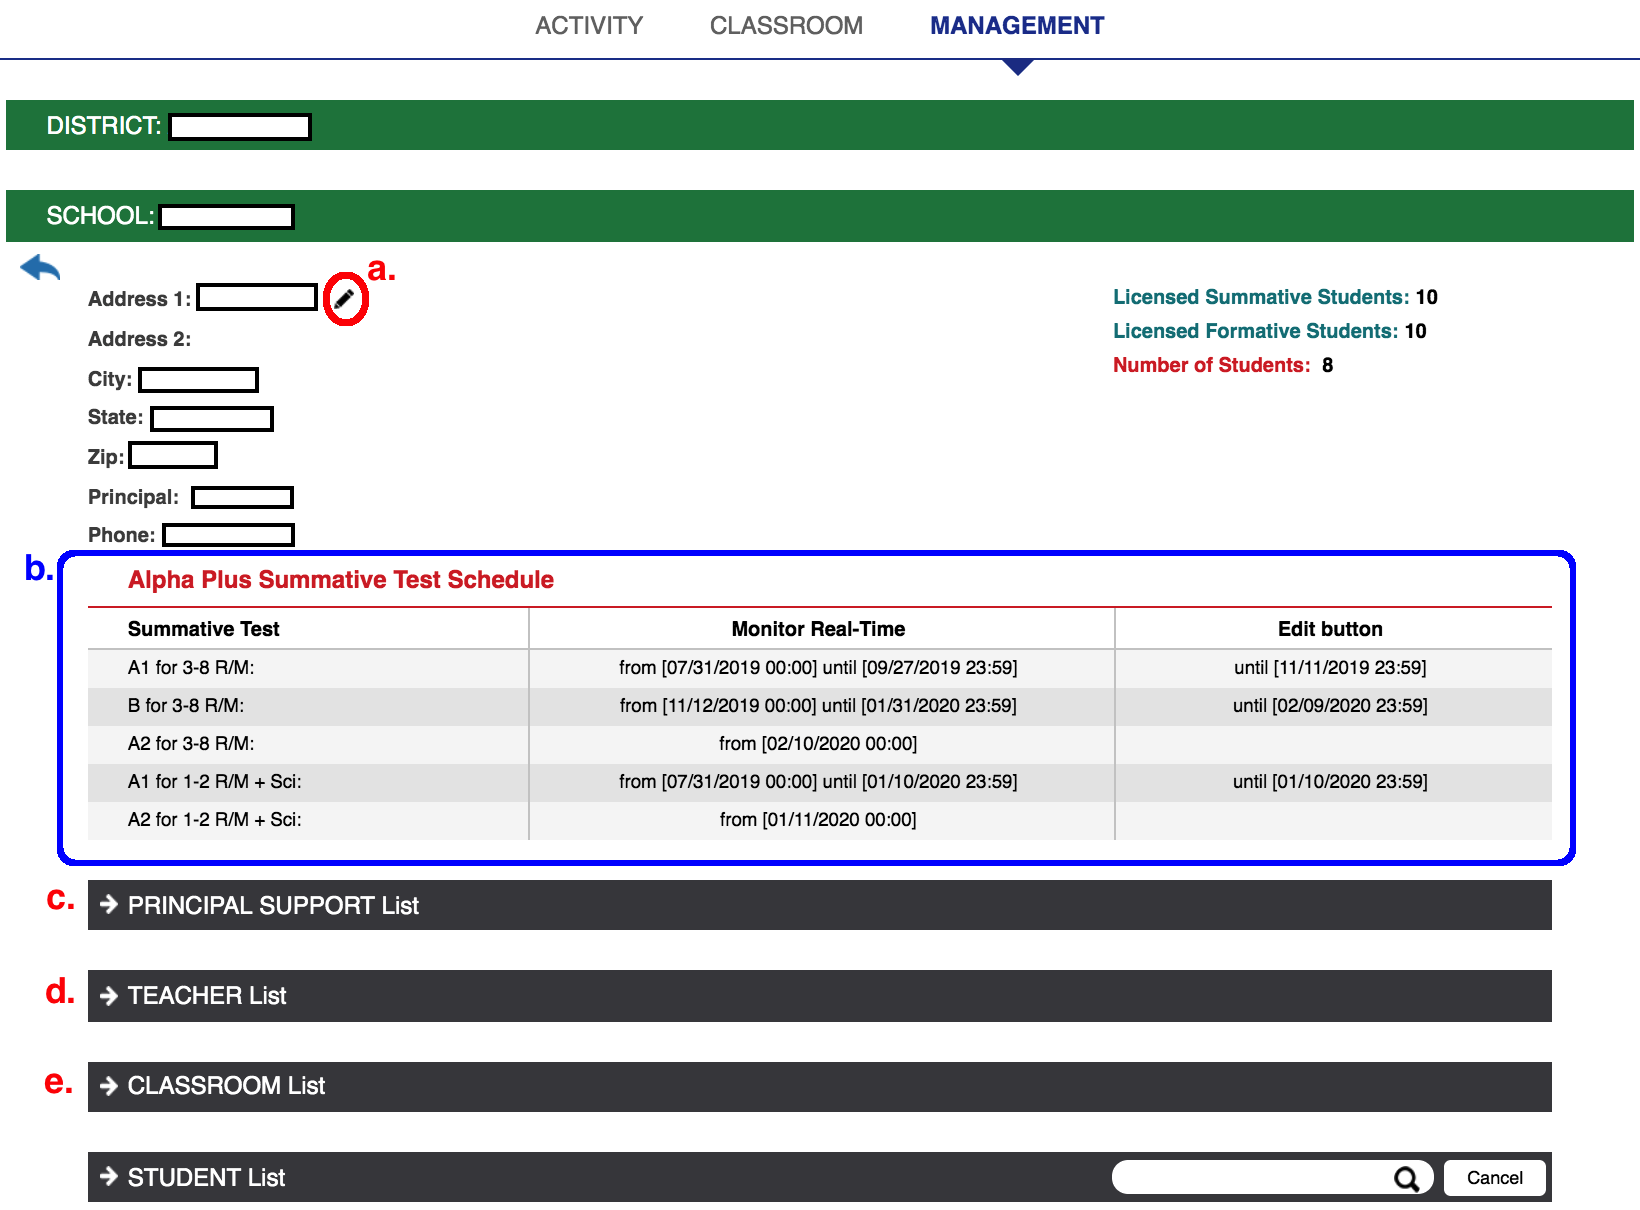
a) Edit School: When you click on this button, a Box will appear for you to edit the School Details.
NOTE: As a Superintendent, you can only change the Principal of the School. To change other information, please contact Alpha Plus.
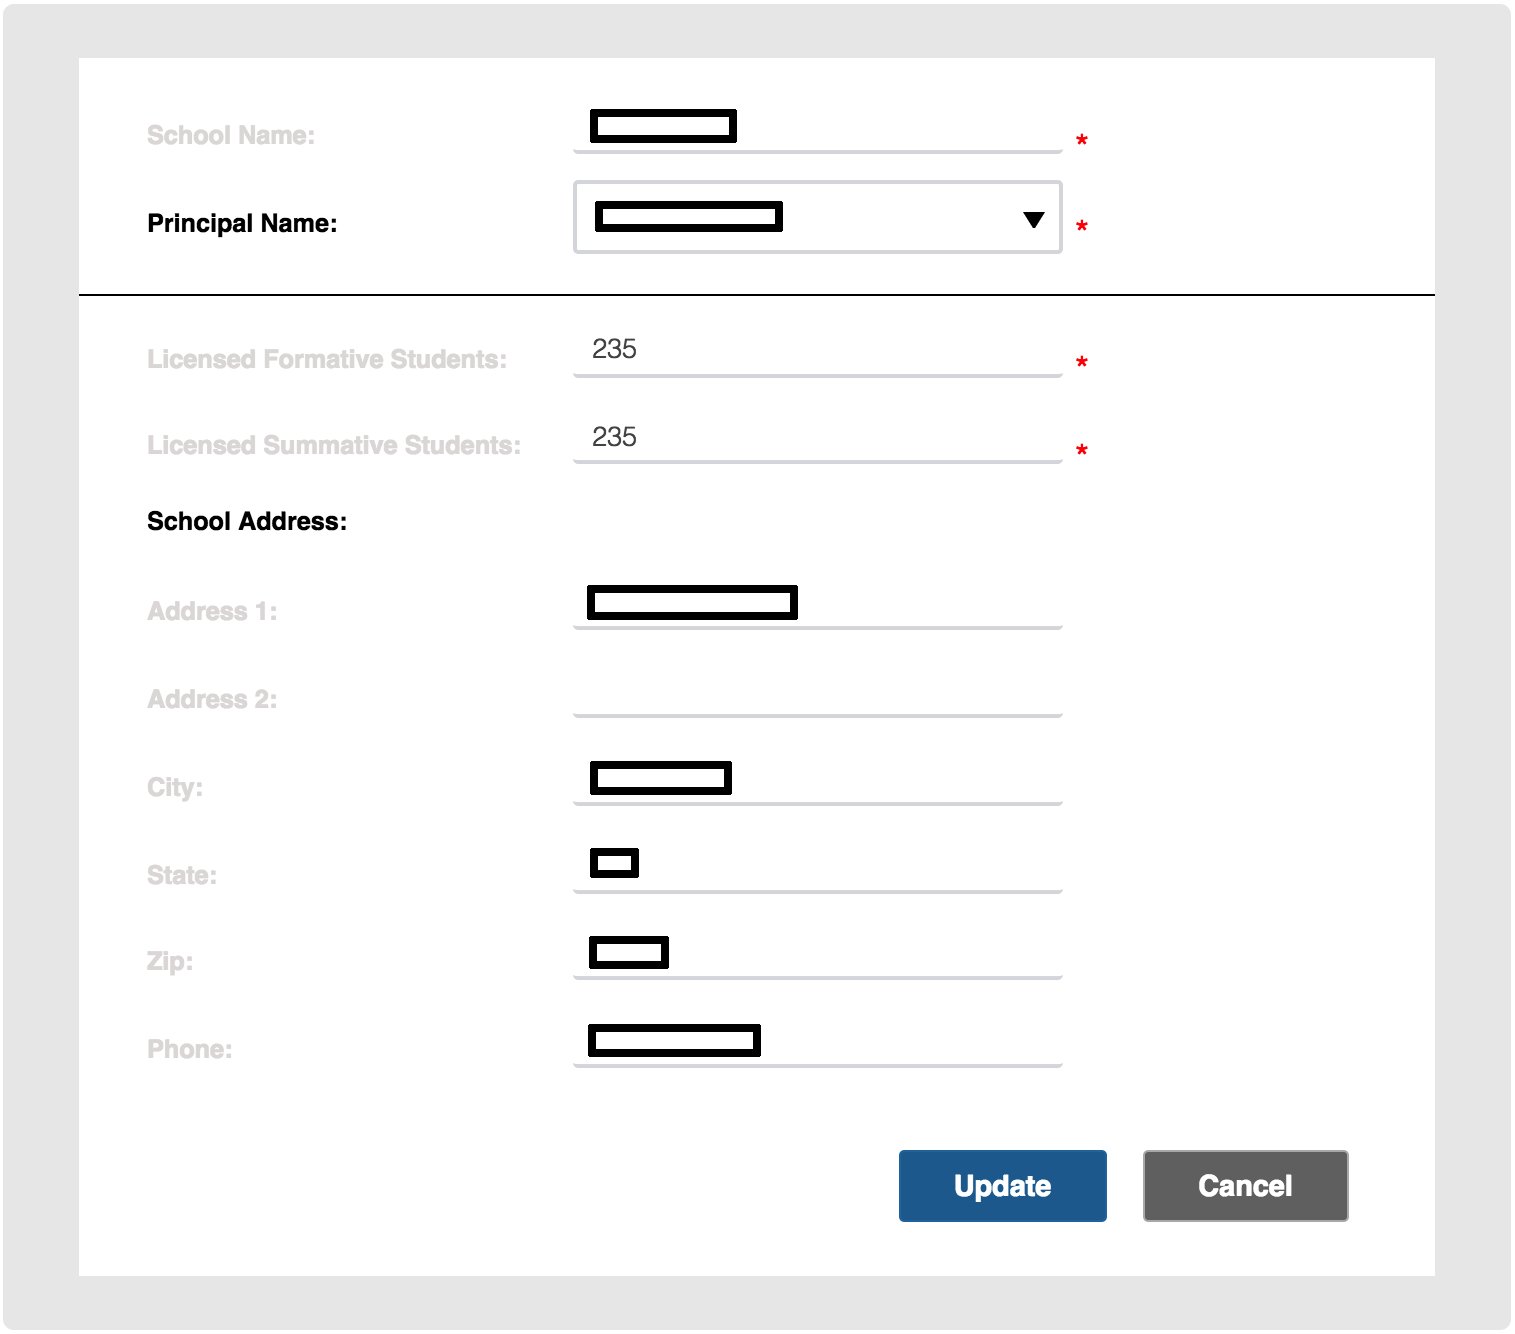
b) Alpha Plus Summative Test Schedule for this School: View-only. To change these, please contact Alpha Plus.
c) Manage Principal Supports
d) Manage Teachers
e) Access Classroom Information
Manage Principal Supports
1. Here, you can only assign or remove Principal Supports in your Schools. This will give them the same Permission and Access as Principals do.
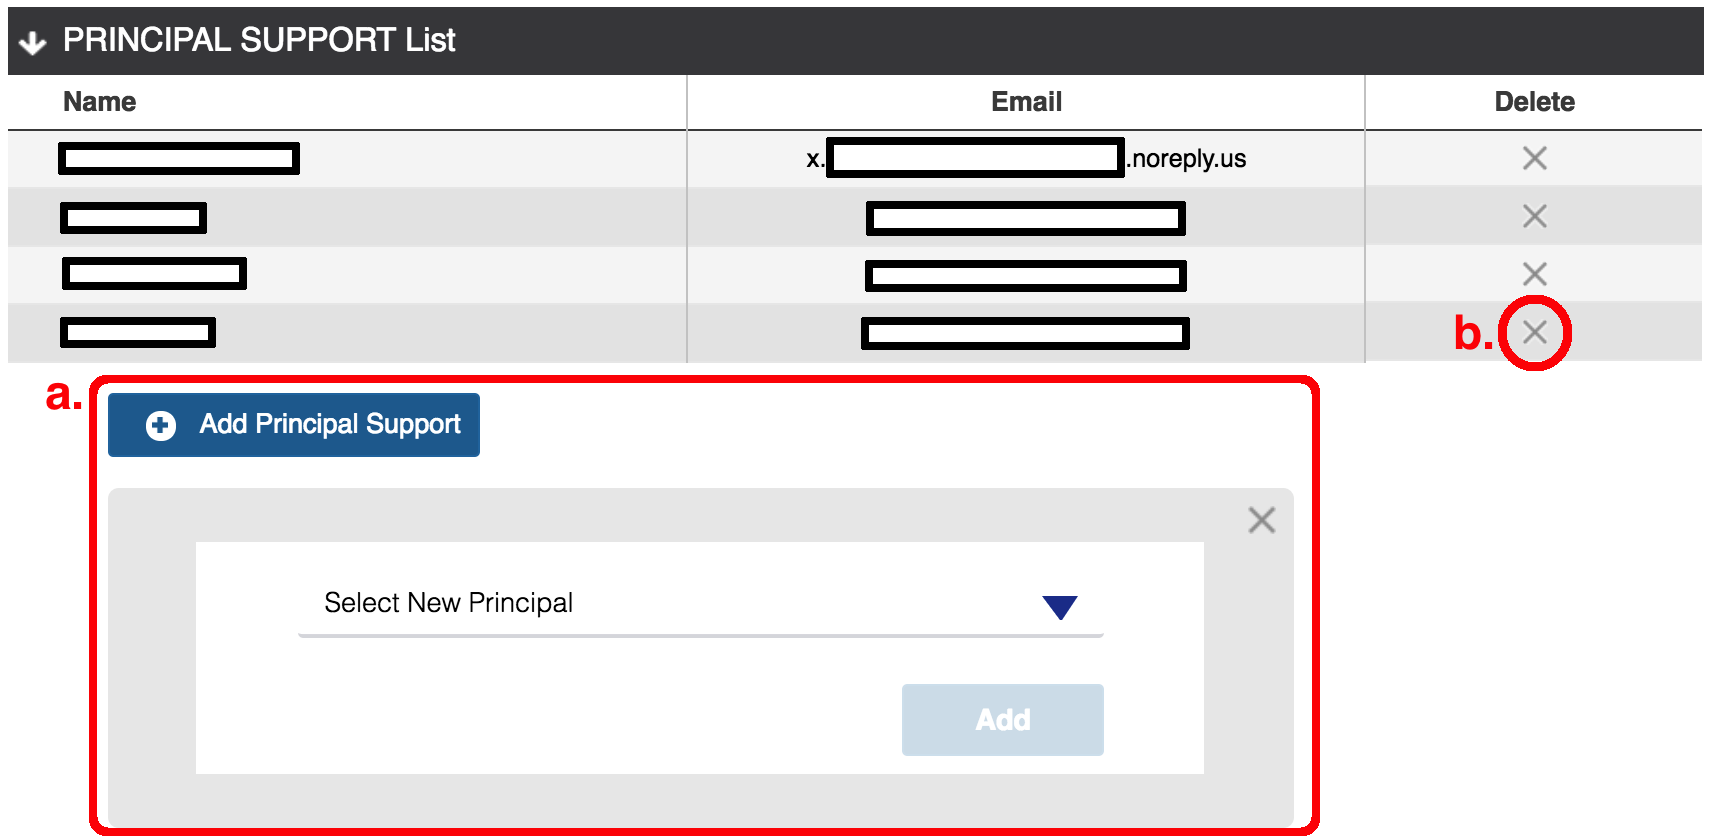
a) Add Principal Support: When you click on this button, a Box will appear for you to select and assign.
b) "Delete" Button: Click on this to remove the Principal Support from your School.
Manage Teachers
1. As a Superintendent, you can Create / Edit / Delete the Teachers in your Schools.
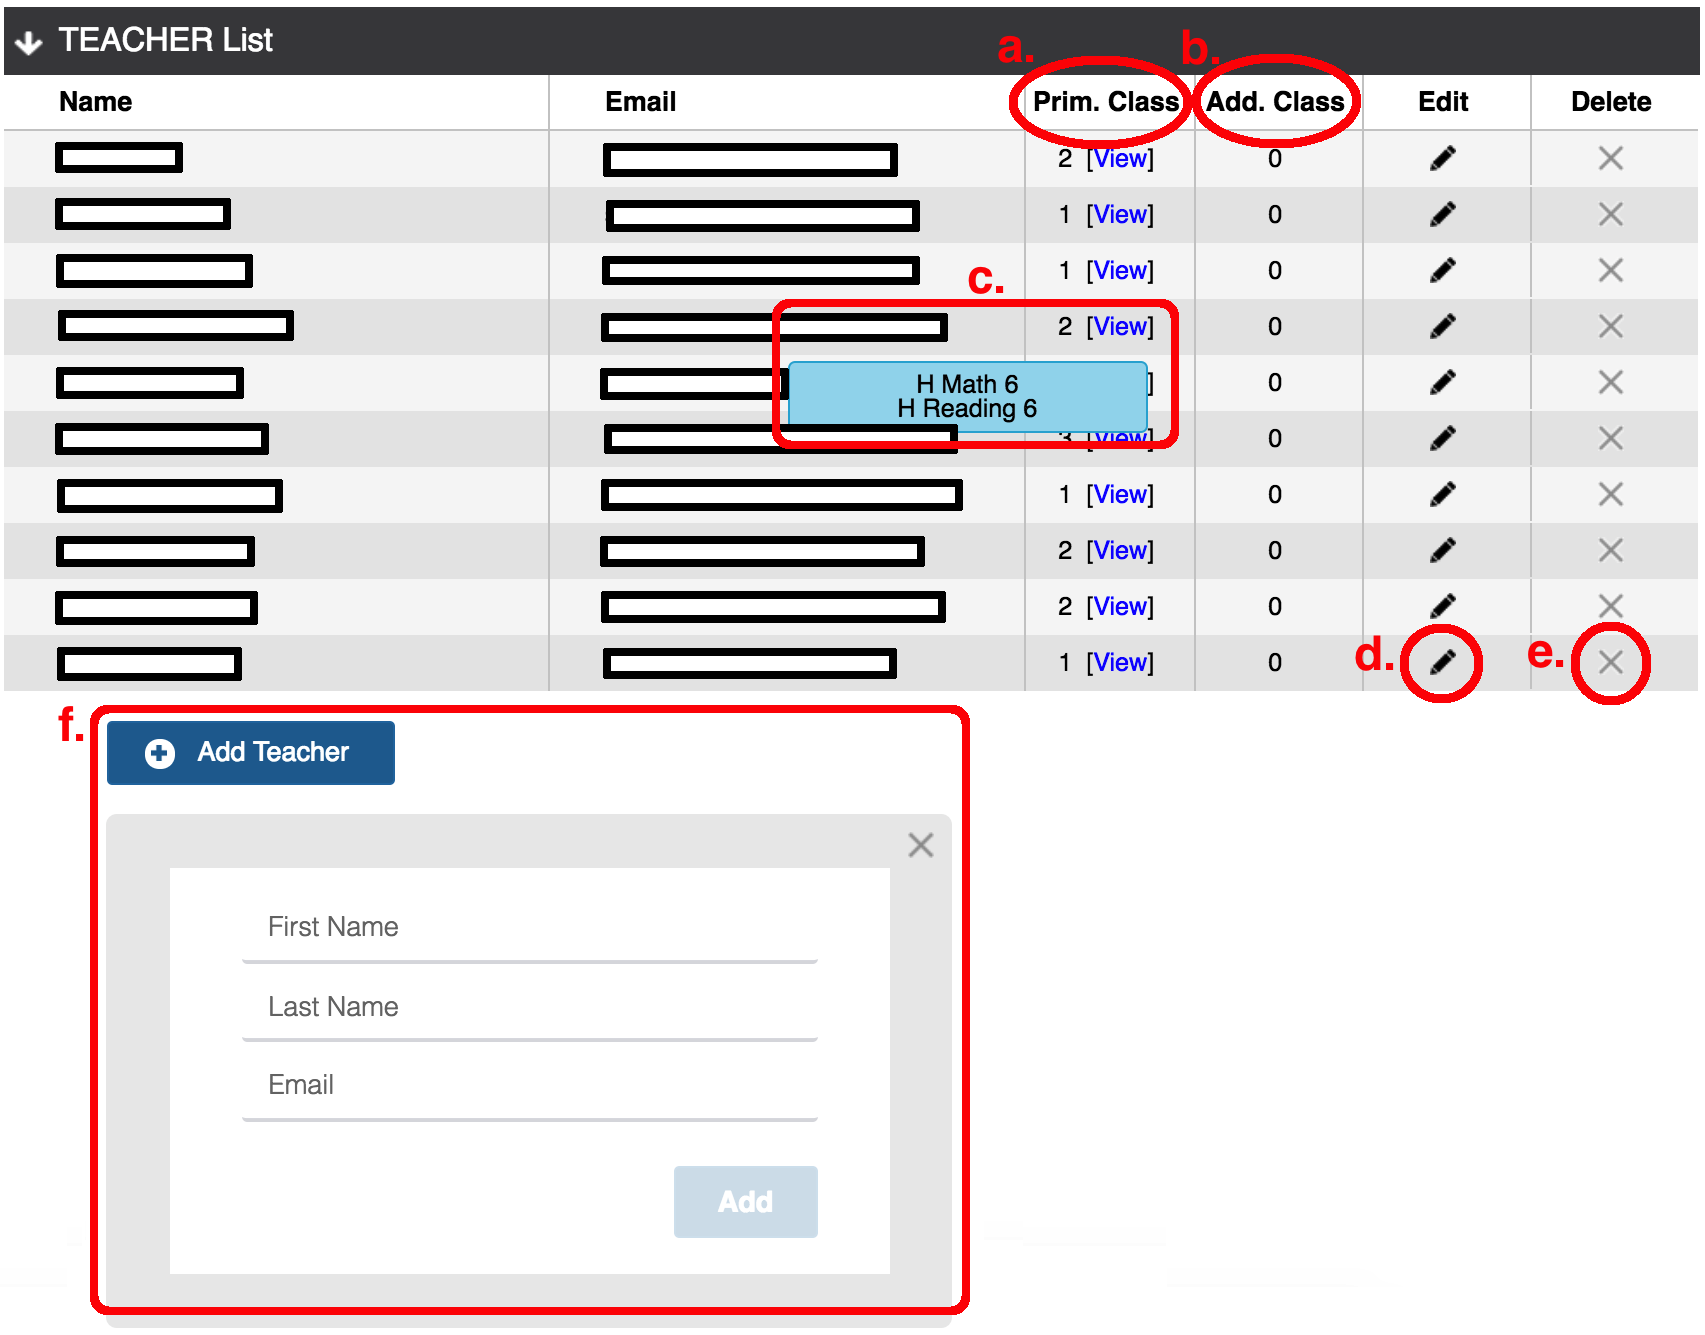
a) Primary Class: How many Classrooms is this Teacher assigned to as the Main Teacher?
b) Additional Class: How many Classrooms is this Teacher assigned to as a Principal Support?
c) "View" Button: When you hover the mouse above this link, you can see the Classrooms assigned to the Teacher.
d) "Edit" Button: You can update the First Names, Last Names and Emails of the Teachers.
e) "Delete" Button: Before you can Delete a Teacher, you must remove him/her from all the Classrooms that he's assigned to. You can do this by going down to Management > Classroom Details screen.
f) "Add Teacher" Button: When you click on this button, a Box will appear for you to create a new Teacher.
ACCESS CLASSROOM INFO
1. Only Admins can Create and Delete the List of Classrooms in Alpha Plus System.
2. As a Superintendent, you can Edit the Classrooms in your Schools only.
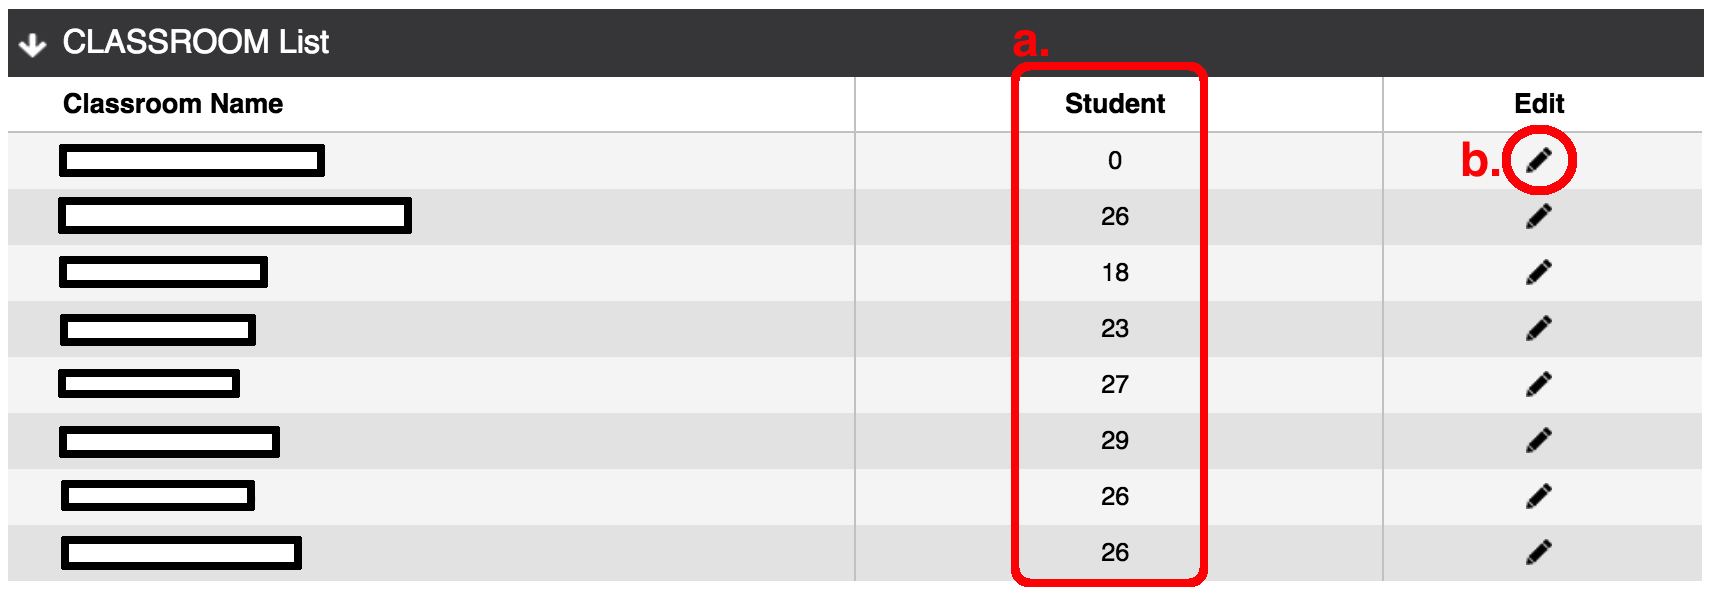
a) Student: This is the number of Students enrolled in this Classroom.
b) "Edit" Button: Click on this to view more details inside.
3. Below is the Classroom Details screen:
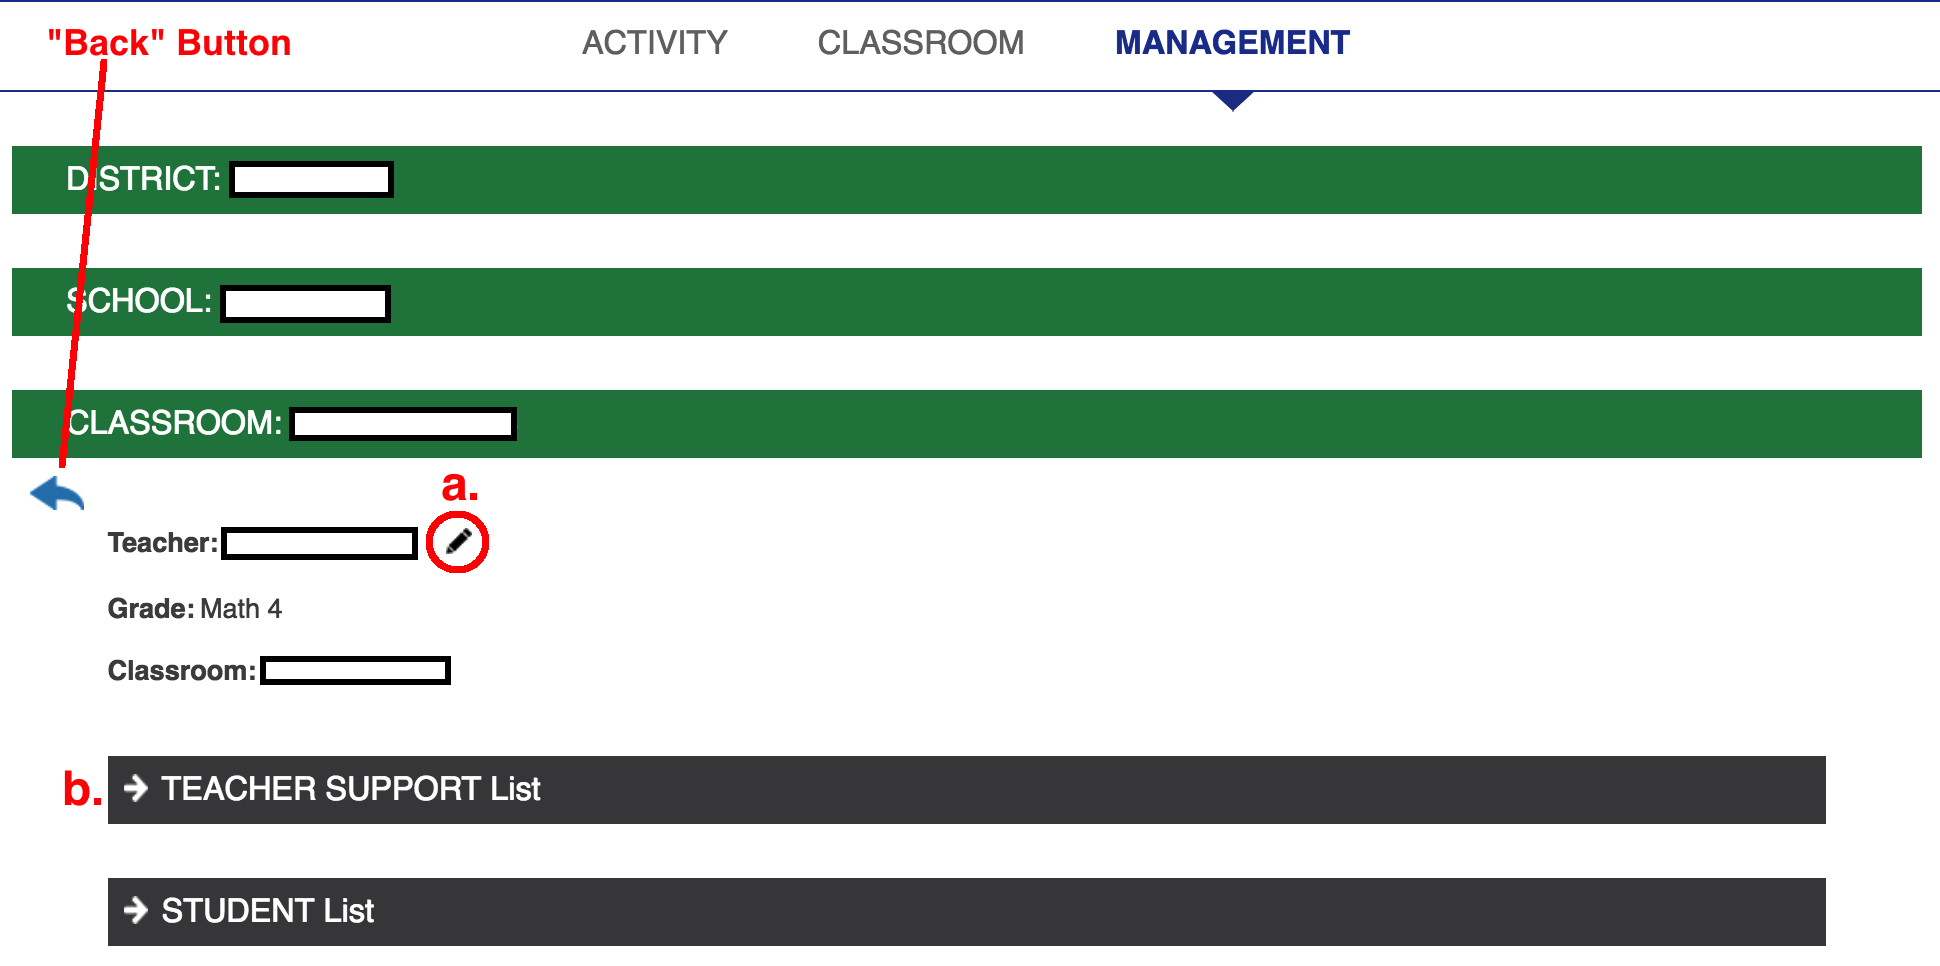
a) Edit Classroom: When you click on this button, a Box will appear for you to edit the Classroom Details.
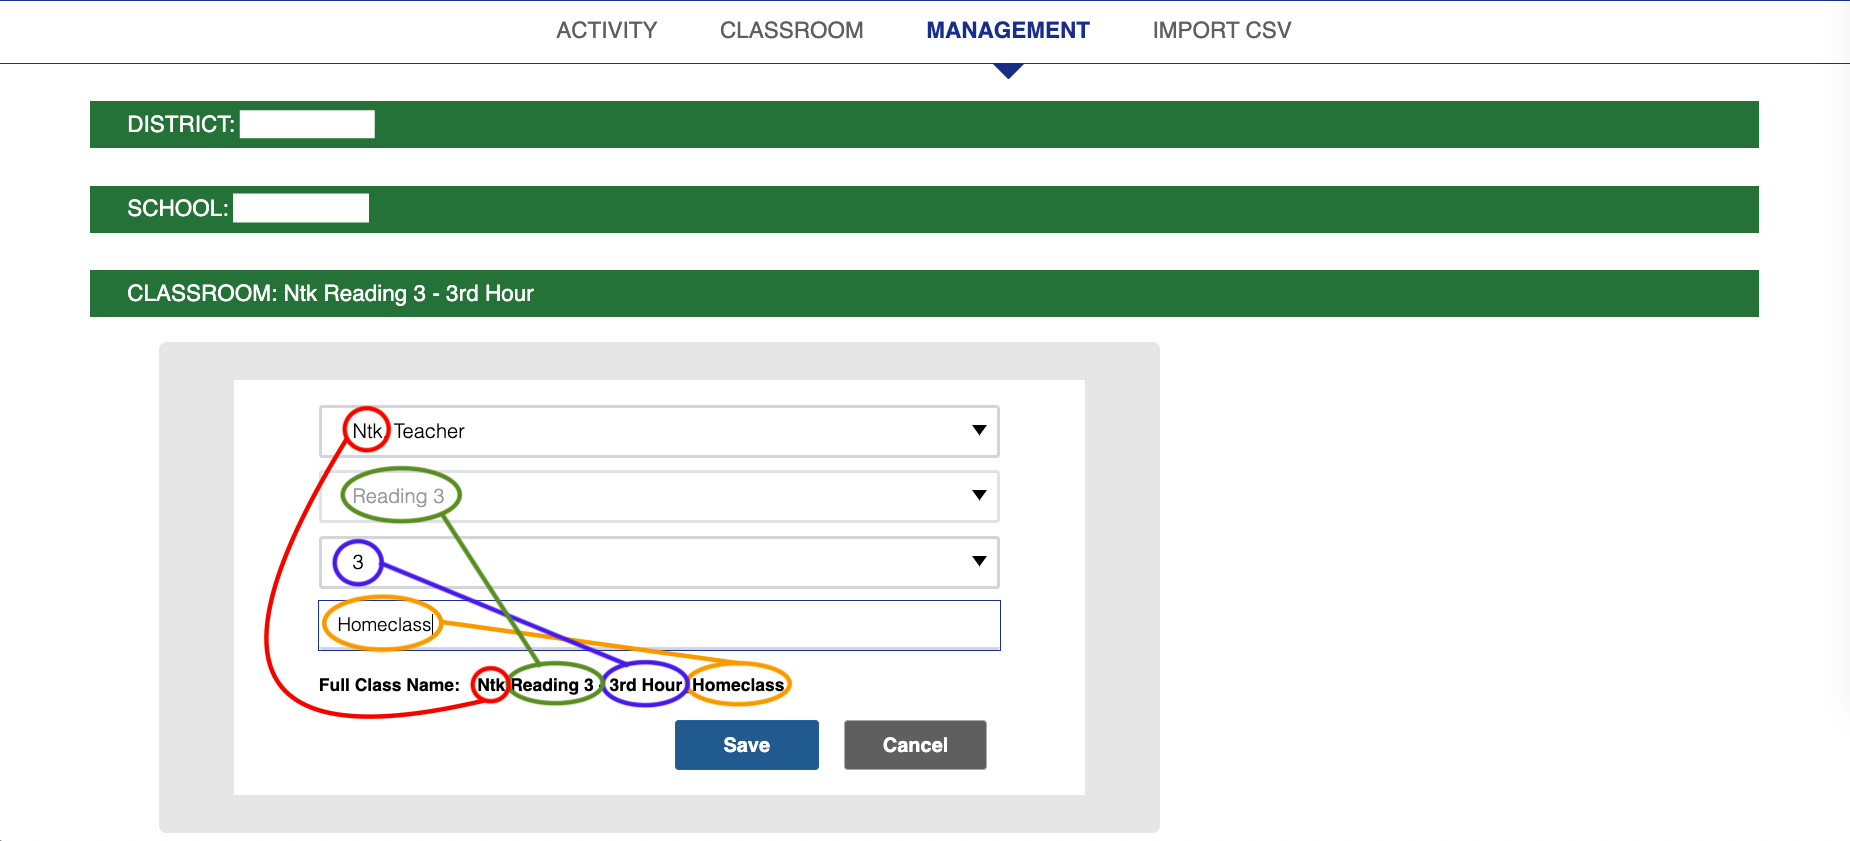
- The format of Classroom Name is [Teacher's Last Name] [Grade] [Period] _ [Note]
- You can use this to update the Main Teacher, or the Period. The "Grade" droplist cannot be changed.
b) Manage Teacher Supports
Manage Teacher Supports
1. Here, you can only assign or remove Teacher Supports in your Classrooms. This will give them the same Permission and Access as Teachers do.
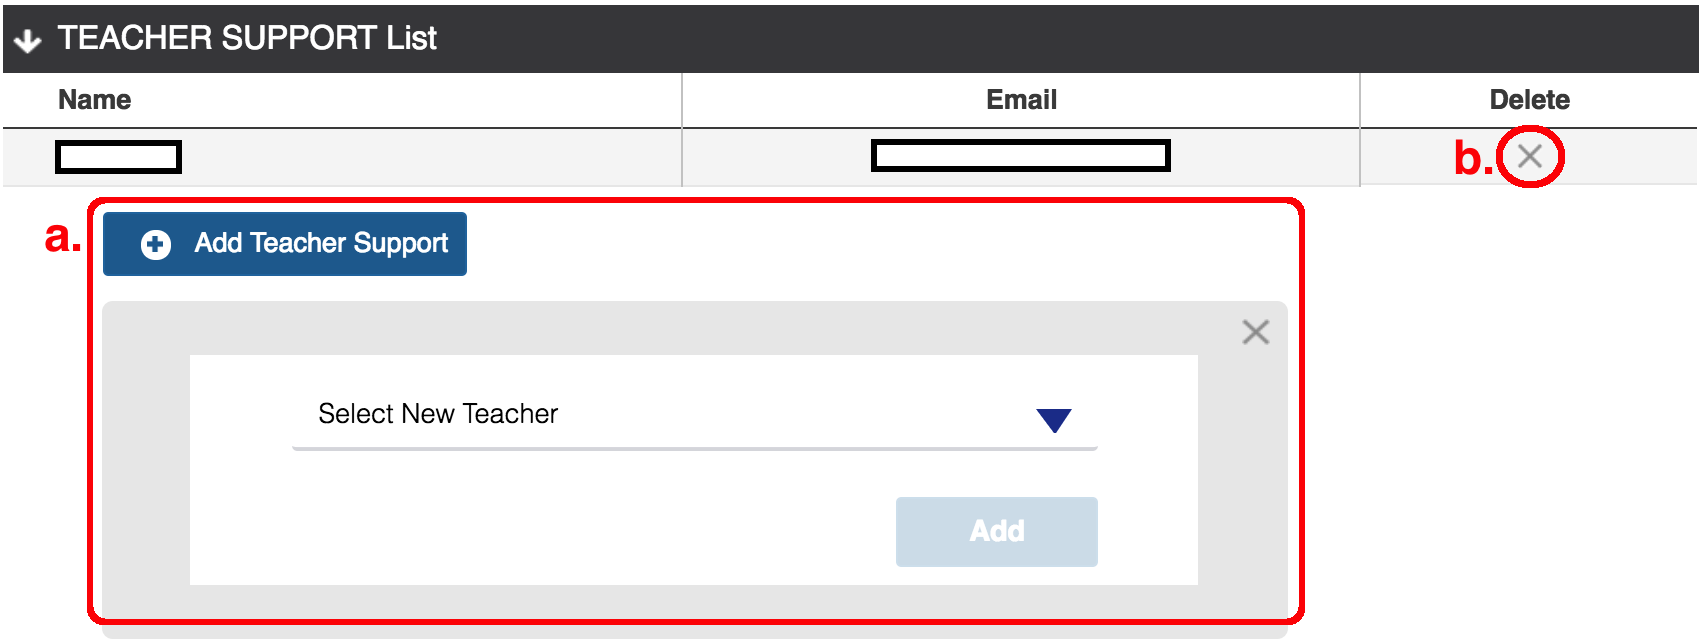
a) Add Teacher Support: When you click on this button, a Box will appear for you to select and assign.
b) "Delete" Button: Click on this to remove the Teacher Support from your Classroom.
Search for Students
1. When you're inside District / School, you can search for Students by Student ID, Last Name, or First Name. Here, we try to search with part of the Student ID.
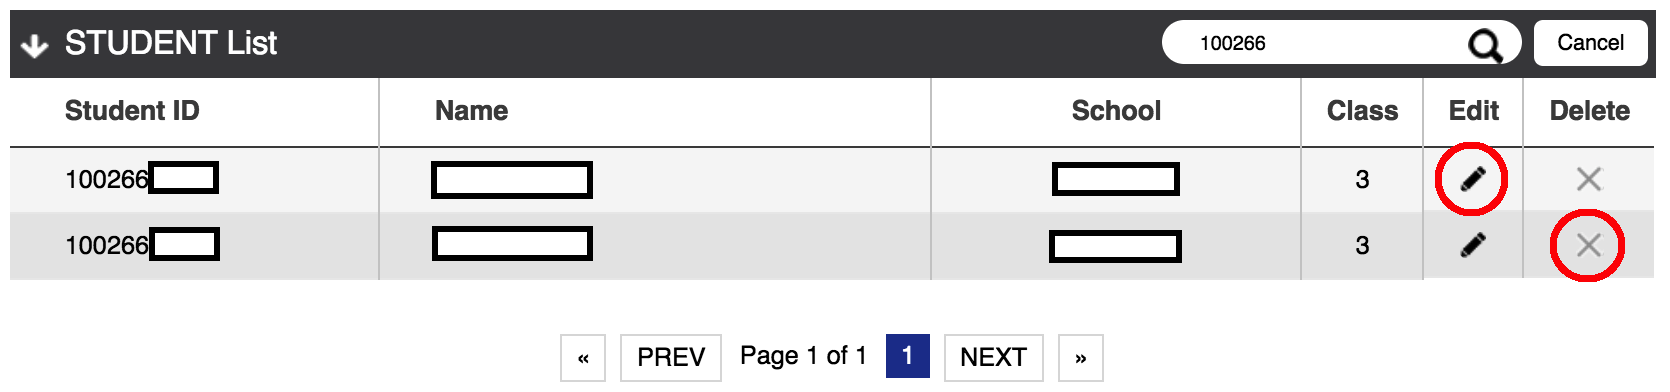
2. If you click on the "Edit" Button, the Student Profile screen will show.
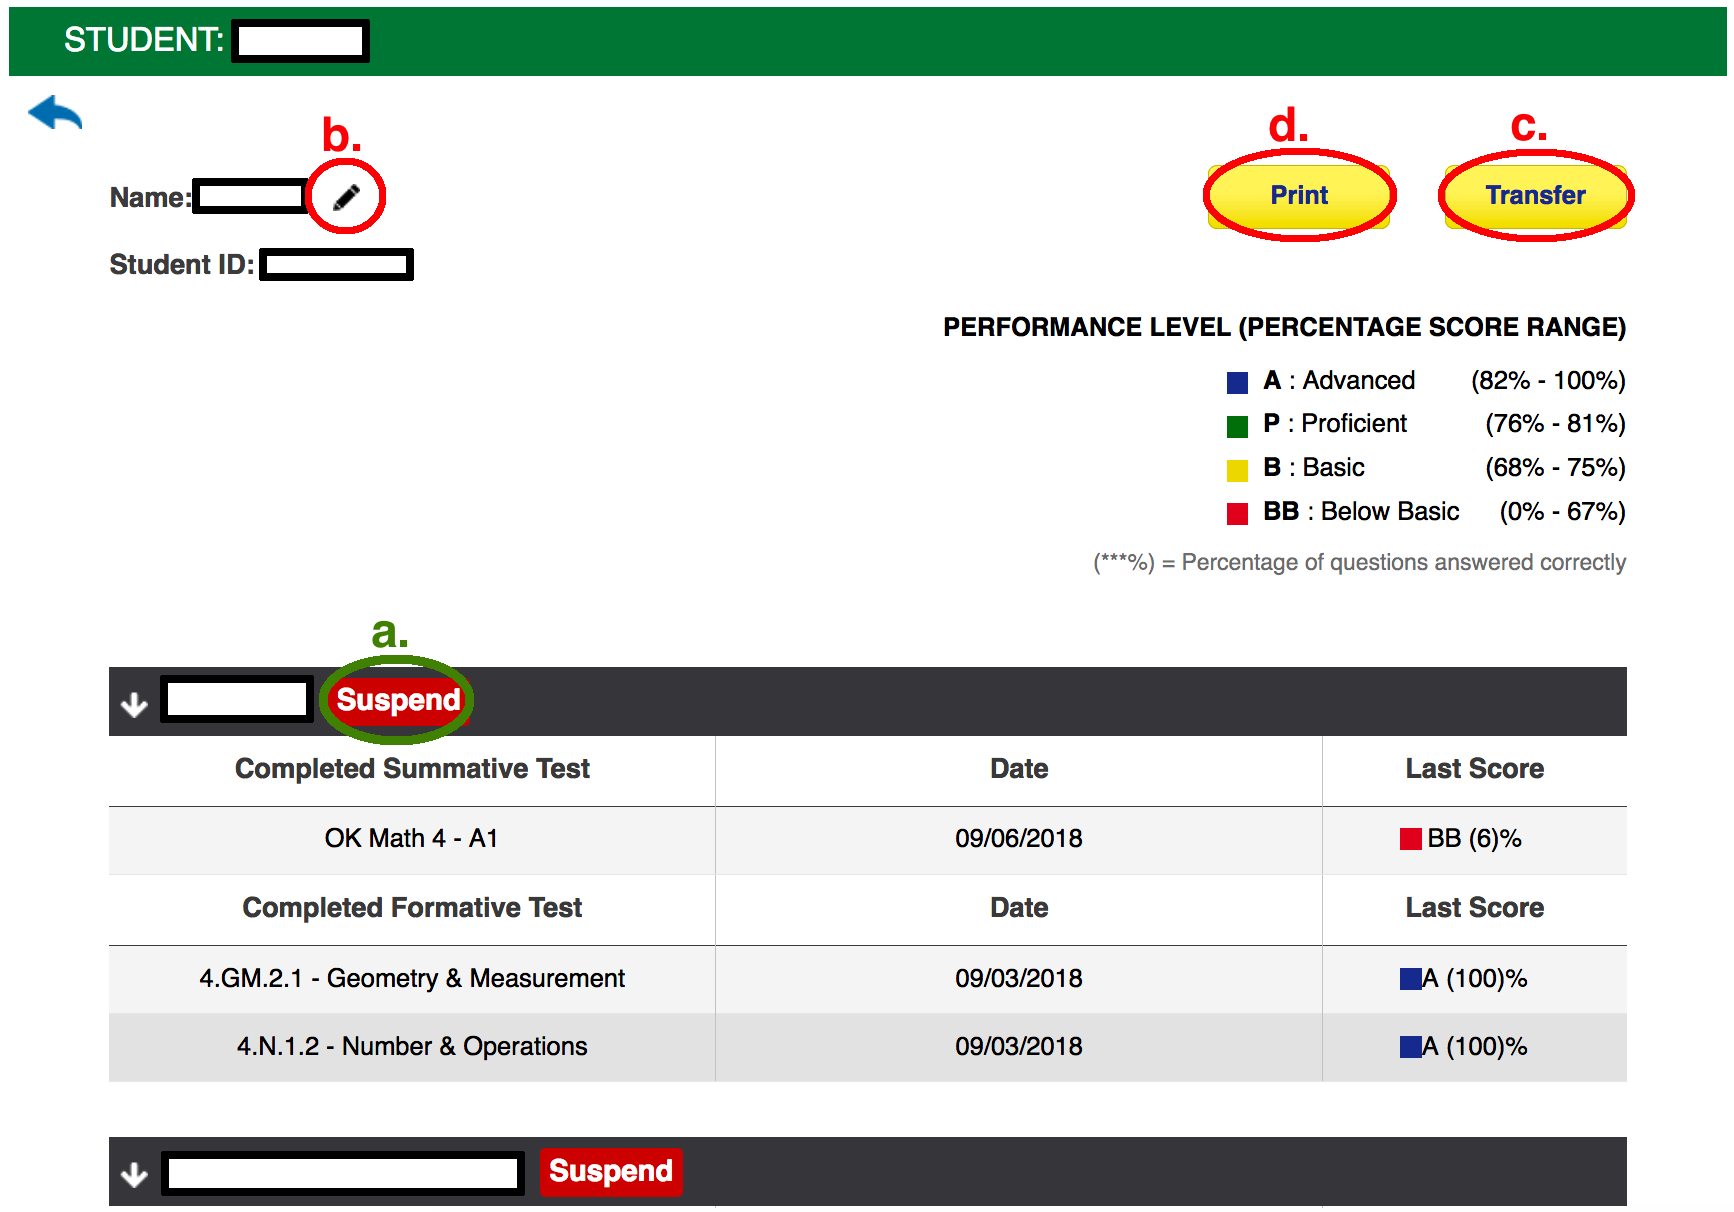
a) "Suspend" Button: Click on this to Suspend the Student from the Classroom. The Student will still remain within his/her School, and the existing Scores will still remain.
b) "Edit" Button: You can update the First Name, Last Name and Student ID of the Student. Please make sure the Student ID is unique.
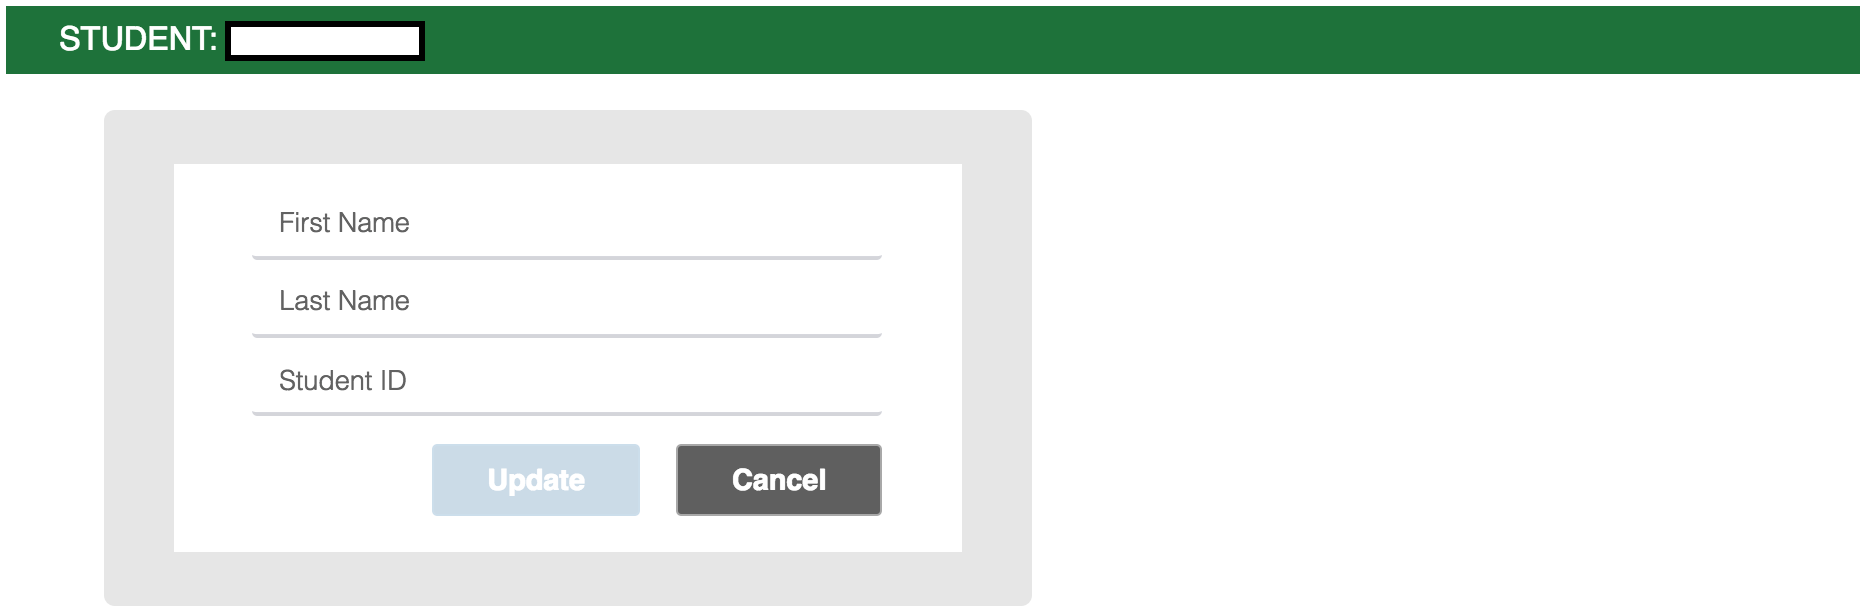
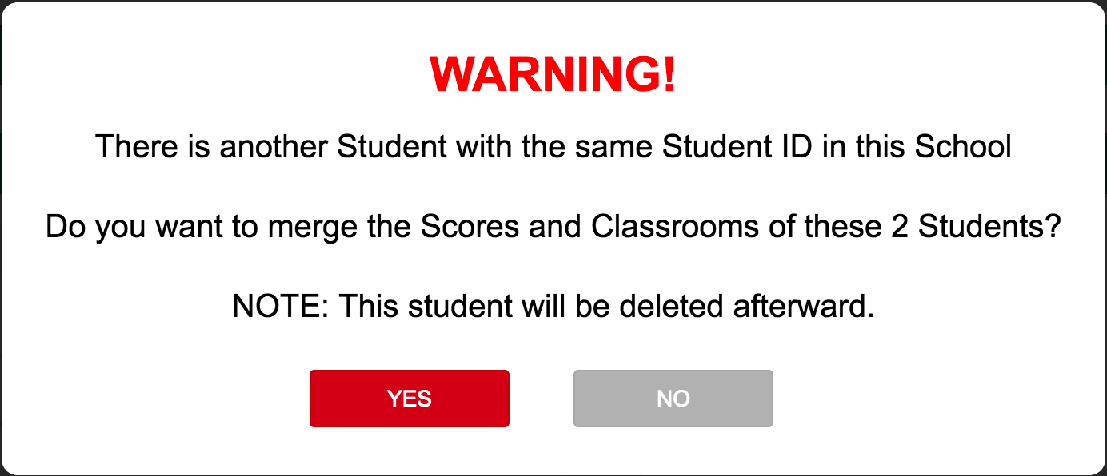
NOTE: If you accidentally have 2 duplicate Student records, eg: a record with correct Student ID [Smith, John - 1001001001], and another with temp Student ID [Smith, John - 2340000001], you can Merge these 2 records by:
Step 1: Go to Edit screen of the temp record
Step 2: Update the temp Student ID from [2340000001] to [1001001001]
Step 3: A confirmation popup will appear. Simply click "YES" to proceed. The temp record will be merged & removed afterwards.
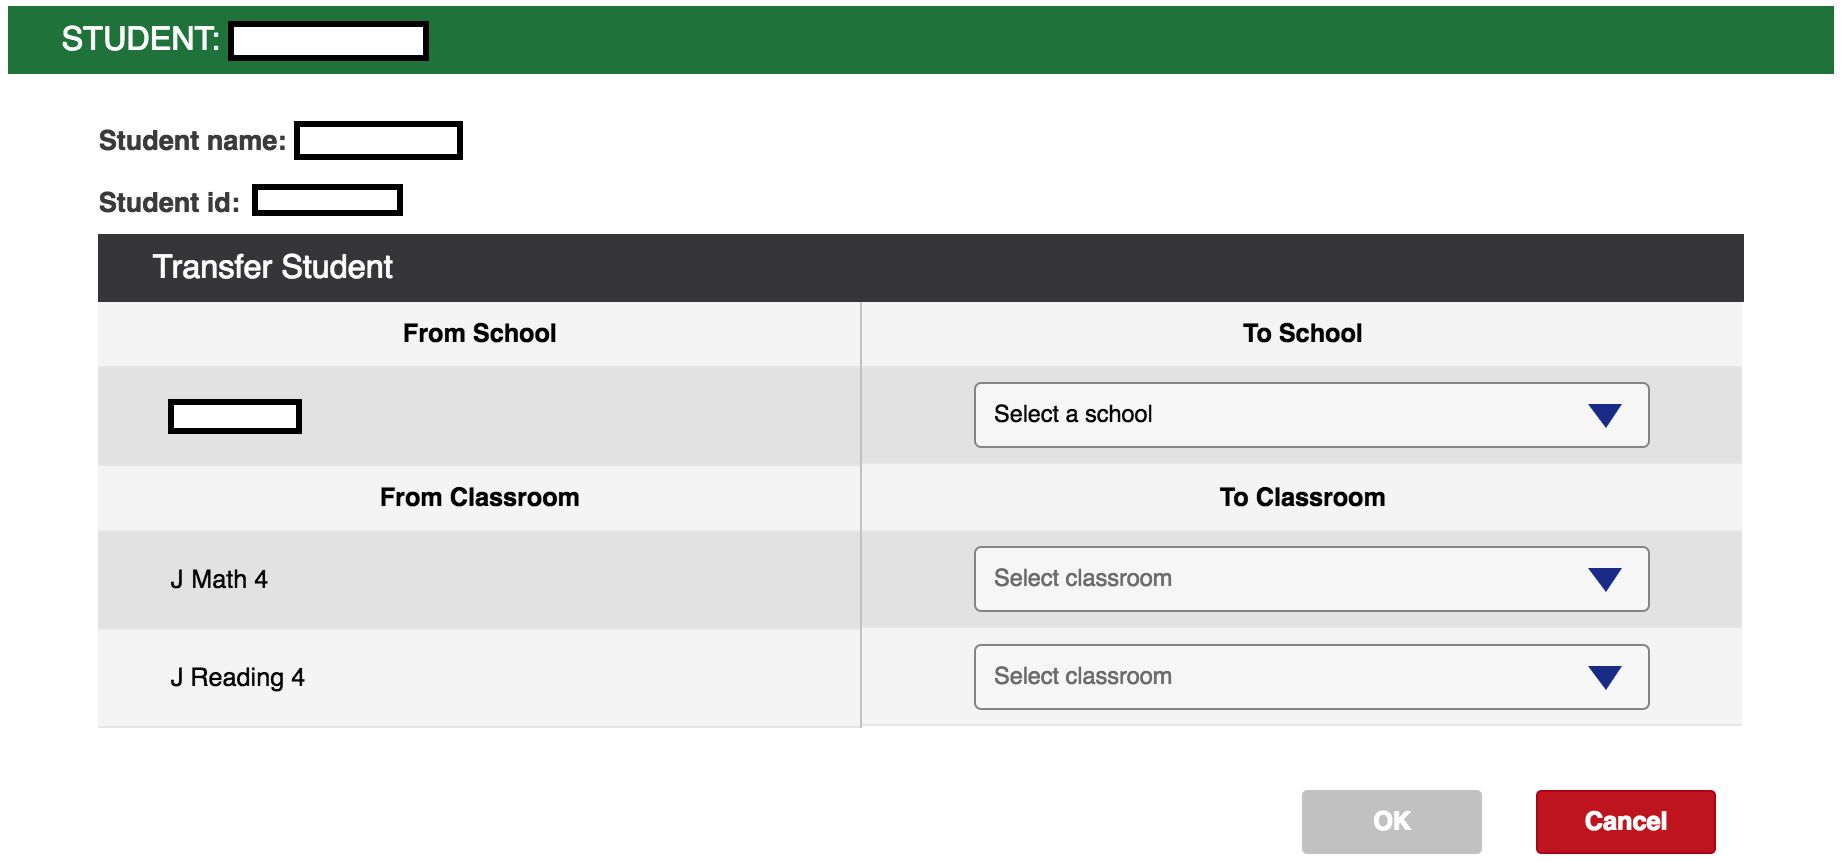
c) "Transfer" Button: You can transfer the Student to another Classroom or another School. All of his/her existing Scores will be transferred as well.
d) "Print" Button: You can download a Printer-friendly version of Student Profile screen, in PDF format.
Add Students
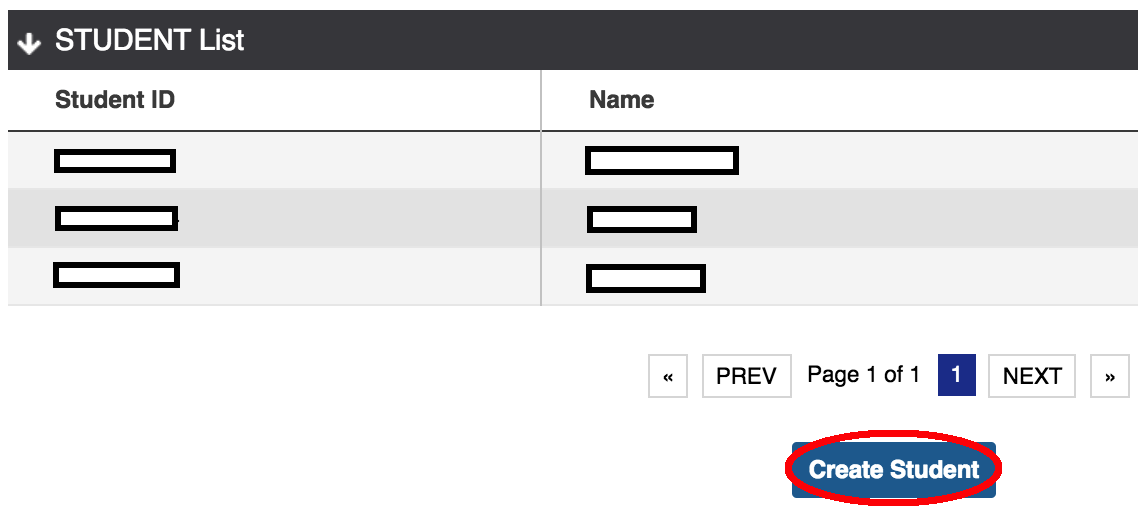
1. When you're inside a School, at the bottom of Students List, you can add new Students to the School Roster.
2. Another way is, when inside a Classroom, you can add new Students to this Classroom.
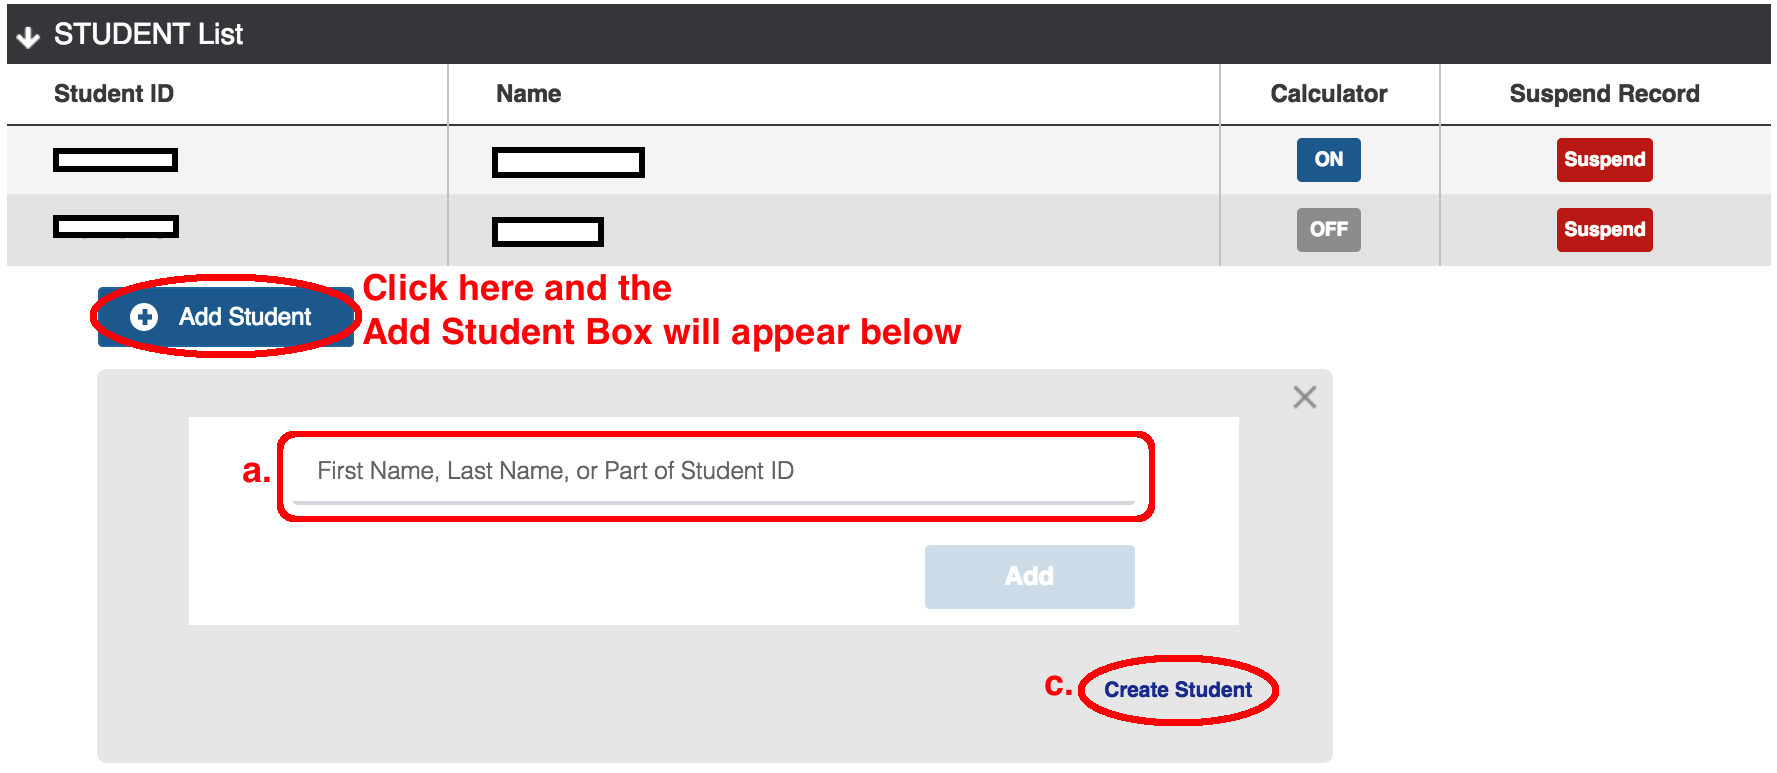
NOTE: Here is where you can Enable or Disable Calculator for a Student. For more details, refer to when Students taking the Test
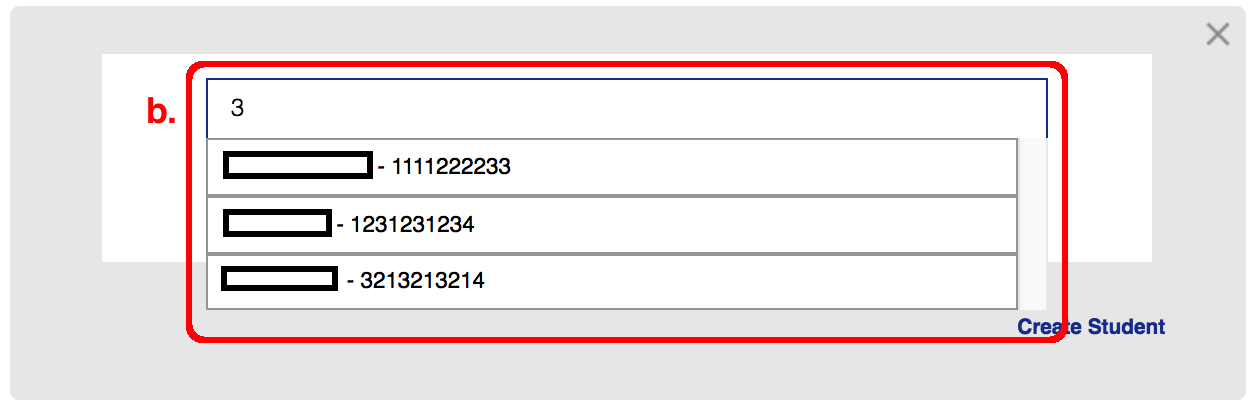
a) Search box: To assign an existing Student within the School to this Classroom, you can search for the Student based on part of the First Name, Last Name, or Student ID
b) Search result: This will appear as you type.
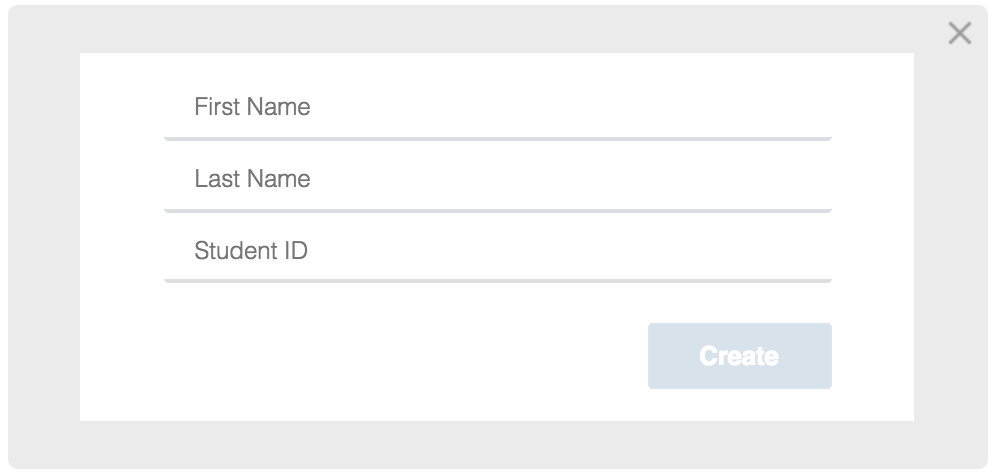
c) "Create Student" Button: To create a new Student that is not yet within the School, click this button. A new box will appear for you to enter Student Info: